Wednesday, November 28, 2012

Mirror, Mirror on the wall...

Let's face it ladies. It takes more than soap and water to keep us looking young and vibrant, especially if you have kids! And here you thought this was going to be about a mirror and some decorating advice.

I've had several people ask me what I use on my face for cleaning or make-up so I thought I'd post some of my favorite things. About two years ago (ironically coinciding with Charlie's birth) I felt like I started looking older and more haggard. Now of course I'm getting older but 35 was hardly the age I should feel like I was looking old. So I started experimenting. About 6 years ago, my friend Jaime bought me a starter kit for Bare Minerals for my wedding. Love it. I am a huge fan of their powder foundation, concealer and bronzer. I don't use the bronzer in the kit but I do use another one they carry. I also like some of their funkier eye shadows that sometimes come in kits but don't generally use the rest of their products. 

So if you are looking for a great make-up that really improves the look of your skin yet still looks natural (plus it's easy to apply) then Bare Minerals is it. I tried all the other options including Bobbi Brown but Bare Minerals was the best.

Now as you know if you have kids, you don't have tons of time to get ready in the morning, especially if you are trying to get to work or to an appointment. So my routine is super fast - seriously I'm talking 3-5 minutes max. I use a few brushes but I apply my blush and eye shadow with my fingers! So here's the run down...


  • Bare Minerals for foundation/powder, concealer and bronzer (to define cheeks) and I use their brushes that came in the starter kit to apply them. I recently switched to their pressed powder foundation and it covers better and more evenly but be sure to color match. It's not the same shades as the loose powder. 
  • Philosophy's Hope in a Tube- use just a dab under my concealer under the eyes to help it sit well and go on smoother
  • Stila's cream blush - huge fan of cream blush as I think it looks fresher and also is super easy to apply with your fingers. Just dab a little on the apple of your cheeks.
  • Lorac's dual mascara - on one end it's a conditioner/primer and the other is the mascara. I find it helps my sad little eye lashes look fuller and also stay healthier
  • Maybeline or any other generic eyeliner (or sometimes I use eye shadow as liner)
  • My favorite eye shadow is an Ulta brand that I usually apply with just my fingers. I don't tend to spend much on eye shadows
  • Lipstick and Lip Gloss are Bobbi Brown. I occasionally will use Mac but 99% of the time it's BB. I won't really even buy other kinds anymore because it's just even comparable. (if in Columbia, it's found at the Belk at Columbiana Mall)
Simple, easy, not a huge fuss. Of course I have other things I use if we're going out and I want to spend more time on it but generally, I go with basics. 

Optional items are Bare Minerals Prime Time that helps the powder go on smoother and stay on longer. I've also heard good things about their new under eye concealer but I haven't tried it yet. 

As for my skin care, I've recently adapted a new routine. I must wash my face at night and I must use a wrinkle fighting skin care treatment. If you don't use one or you don't wash your face and moisturize at night (no matter your age) - START! It will make a difference. 

I just bought a starter kit by Philosophy (found at Ulta) that is Miracle Worker for anti-aging.  They have a lot of other options but this one seemed to fit the best for me. I've used it for a few weeks and can already tell a difference in my skin and under my eyes where I tend to have dark circles, wrinkles and puffiness. Here's the steps:
  1. Wash: generic towelettes similar to Oil of Olay (not the pre-wet ones) to remove make-up. I find mine at the grocery store.
  2. Philosophy's Miracle Worker (retinoid pads): these are anti aging retinoid pads that come with a serum you pour over them when you first open. I cut them in half so they last longer. Once your face is clean you simply wipe this across your entire face.
  3. Philosophy's Miracle Worker Anti-Aging Concentrate: simple little serum you apply to your face
  4. Philosophy's Eye Hope: used under the eye to fight dark circles, puffiness and lines. A half pump of the bottle is all you need each night.
  5. Philosophy's Miracle Worker Anti-Aging Moisturizer: this is a great moisturizer that leaves the skin soft and supple
Now I will warn you that none of this is cheap. The starter kit was much less expensive which is why I started there, but it doesn't come with the Eye Hope. Keep in mind it does last for a very long time (the small bottle of Eye Hope lasts 9-12 months so it makes the $50 price tag hurt a little less). 

So there you have it, my favorite items in my make-up basket and the new skin care products I just discovered. And I have come to realize that some of the wrinkles under my eyes are not going to go away no matter what I use. Those are from age, genetics and sun damage. But at least I can fight new ones! 

I hope that helps all of you who are searching for new brands or something to work for your skin. 

Does anyone else recommend any really good products? Like any particular skin care line? 

Tuesday, November 20, 2012

Carb heaven is almost here!

Well at least that's what Daniel, the hubby, likes to call Thanksgiving. Once again we'll be staying here for Thanksgiving versus traveling. When we started having kids we chose Thanksgiving as the holiday we'd stay home so we could rest, plus Daniel usually has to work on Black Friday. Apparently people like to work off some of the glutton the day after.

Now I grew up eating Thanksgiving with at least 18-25 people (all family mostly) and we had TONS of food to choose from. I have to say I struggled this year with "Should I fix a full meal? Should I fix a contemporary meal? Should we do something else?" Finally enough people pulled me out of my slump and told me to fix a normal meal on a smaller scale. So at the request of dear old hubby, who chose our fine menu, here's what we're having:
  • Turkey
  • Stuffing/Dressing
  • Gravy
  • Green Beans
  • Mashed Potato Casserole
  • Sweet Potato Casserole
  • Macaroni and Cheese
  • Rolls
  • Pumpkin Pie with homemade whipped cream

He was very specific when he gave me the "Please can we have" list, as you can tell by the homemade whipped cream request. Tomorrow I'll go ahead and make the casseroles so they can cook the next day while the turkey is in the oven and I won't have to prepare them all on the same day. I need to test what will fit and not fit in our oven so I can decide if I actually need to pre-cook anything to just be reheated in the microwave if I'm in a pinch. I'm not 100% sure that all the casseroles and the turkey will fit in my little oven. Oh how I dream of a bigger kitchen some day (with double ovens).

But without further ado, here's a yummy recipe for homemade macaroni and cheese. I've tried many but this one is the absolute best!

Macaroni and Cheese
(found on www.recipezaar.com)

Ingredients
  • 8 oz macaroni
  • 4 Tbs butter
  • 4 Tbs flour
  • 1 cup milk
  • 1 cup cream or half & half
  • 1/2 tsp salt
  • pepper to taste
  • 2 cups sharp cheddar cheese
  • bread crumbs (optional)
Directions
  1. Cook and drain macaroni according to package instructions and set aside
  2. In a large saucepan melt butter then add the flour, salt and pepper, using a whisk to stir until well blended
  3. Pour milk and cream in gradually, stirring constantly
  4. Bring to boiling point and boil 2 minutes (stirring constantly)
  5. Reduce heat and cook 10 minutes (stirring constantly)
  6. Add cheese and simmer an additional 5 minutes or until cheese melts (stirring occasionally)
  7. Turn off heat and add macaroni. Toss well with cheese sauce until coated.
  8. Transfer to a greased baking dish.
  9. Sprinkle with bread crumbs OR top with a little shredded cheese
  10. Bake 20 minutes at 350 degrees or until top is golden brown
Bon Appetit!

Tuesday, October 30, 2012

Mo ice peese

What? You don't speak toddler? For those of you who need a translation that's Charlie speak for "more rice please" which is a common phrase around our house. I've read in plenty of places that when you're trying to get your toddler to try new foods to always include something they love on the plate too. It used to be mashed potatoes in our house but since my mom taught me a new way to make rice, it's now rice. We eat it all the time as a side dish, which I'm OK with given that we use brown rice with black lentils and couscous in it. So for all you mom's looking for a new side dish that the kids should love, here it is (and shhh it's actually not bad for them!)

I use Rice Select Royal Blend rice with flaxseed and the specific kind I get is Texmati Light Brown Rice with whole wheat pearl couscous, brown flaxseed and black lentils. It comes in a clear container found in the rice section. They make other types but after comparing and trying others, this one has the most flavor, texture and nutritional value.

  1. Measure out the amount of rice you plan to prepare (for us it's 1 cup)
  2. Measure out the required amount of water (for us it's 1 pint) listed on the package instructions and add 1-2 cubes of chicken bouillon. Or if you use the Better Than Bouillon then it's 1 tsp.
  3. In a sauce pan, melt 1 TBS butter
  4. Gently sautee the rice in the butter (just a few minutes)
  5. Add the water/bouillon mixture and bring to a boil
  6. Reduce heat and cook (covered) the required time (as indicated on the package)
It's literally that simple. The butter and chicken bouillon give it a wonderful taste and no other seasoning is required. It's SO delicious!

Bon Apetit!

Creative Memories

And no, I'm not talking about the scrapbooking brand called Creative Memories. I'm referring to a few neat and creative ways to make memories. We went to a wedding not long ago and then I also helped give a baby shower this weekend. Each had some fun, unique ideas that can be morphed in to any type of event.

At the wedding, in lieu of the typical picture frame/matting you sign, they had a tree printed with their initials in the center. Each person then used their thumb print as a leaf and they had various colored ink pads to choose from. We all signed our names beside our finger print.


They also had their name and wedding date printed at the bottom. A very unique way to remember the day. Although we all joked that really the groom wanted all of our finger prints for the national database since he's a Border Patrol Agent.


In the end it looked like this. (sorry my iPhone wasn't taking the best pictures that night)


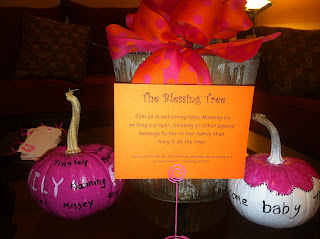
I also had the pleasure of helping host a baby shower for a friend this past weekend. I stole this idea from a previous baby shower I attended earlier this year. It can so easily be tailored for a wedding shower too. It's called the Blessing Tree.

I took a simple bucket from the yard and put floral foam in the bottom so the branches would sit in something.
 
 
Then I just stuck the branches I found in the yard in the bucket and put some moss around the edge to hide the foam. I made a quick bow that matched the color scheme and viola! (please disregard the cat food sitting beside it. oops!)


It was that simple to make! I also found some pre-punched cards at Hobby Lobby. We took pink and orange ribbon and added it to the cards so they could hang on the tree. We even took a little stamp of baby feet and added them to the cards to spruce them up a bit. In the end, it looked like this:


 And while we were decorating, why not use some seasonal items!? I took some basic small pumpkins and painted them to add additional decorations. Some I spray painted white, some I painted pink and others I left their natural color. Once they were dry, a quick clear coat of acrylic spray paint was all they needed to be pretty and shiny. 


But if you were giving a wedding shower, party or even just decorating your house for fall, painting pumpkins is an easy way to take advantage of a seasonal item and make it your own. How cute would bronze and gold pumpkins be on a table for Thanksgiving? Super cute.

So those are some simple yet easy creative ideas I just wanted to share in case you were looking for something unique!

Thursday, October 11, 2012

"Just like old times"

I'm sad this post is so late but due to unforeseen work issues, it is what it is.  I didn't want it to be skipped because it was so much fun. Three weeks ago (can you believe it's been that long girls?) I was able to sneak away and drive to Raleigh for a night. If you don't know, I'm originally from Zebulon (a suburb of Raleigh) but I also lived in Raleigh for 12 years and its been over a year since I've been back. Technically it was under the premise of visiting my corporate office for the afternoon so they could indeed see that I do exist as a human and not a voice over the phone. While I was already there, I decided to stay the night. And while I was spending the night, I might as well go shopping the next day. After all, my yard sale cash was burning a hole in my pocket!

So off I went for the 3 hour drive. Can I just say I'm so glad I don't have to be in an office every day by a certain time? I'd be late every day. I arrived around noon and worked in our office until 5pm and then was off to Jaime's house. Jaime and I met at a wedding for a mutual friend about 9 or 10 years ago. I'll spare the details but she likes to say she felt sorry for me (since I went through a divorce shortly after) and used our dogs as an excuse to hang out. Really it's because I was so cool and she wanted to hang out with a cool kid.

Anyhoozle, when I arrived she immediately put me to work. Not joking. I even have a scar on my toe to prove it from trying to move a piano which rolled over my toe. While we caught up, I rearranged her dining room (and maybe worked on a few other areas). Then it was time for dinner! This was what I was excited about. A chance to have dinner "with the girls".

The attendees were Jaime, Megan (also met her at the same wedding - wow, that was a good wedding!) and Jaime's sister, Mandy. When we went to pick up Megan and after I got the  new house tour, she volunteered to drive in her convertible since it was such a nice night. And the night just got better...

 
As we were getting in the car, I said "aw, just like old times!" because these were two of the girls I hung out with most when I was working and living in Raleigh.

Then it was off to pick up Mandy. Once again, got the house tour and while I was there spent 5 minutes sharing how I'd rearrange her living room (solicited! I'm not some wacko that just barges in and tells you what's wrong with your house).

We headed to North Hills to a restaurant called Mura, a yummy Japanese sushi bar. I've been there once before and loved it. We all had a chance to catch up - me about life in South Carolina, Jaime about the kids, Megan about the new house and work, Mandy about joining eharmony (OK that may have taken us on a major tangent). At one point our waiter may have become embarrassed (ahem, Megan) and throughout dinner if someone said "just like old times" we all had to take a sip (of whatever we had).

 
After two cocktails and a belly full of edamame and sushi, we headed back to Megan's where we talked for hours (minus Mandy who went home because she had a long run the next morning with her running group). We decided that Mandy looked like Thelma from the movie Thelma & Louise in the back of the convertible...


I laughed the hardest when Megan couldn't stop hiccuping (apparently she hiccups if she eats too much) and when Megan told Jaime to cut her story short (Jaime is notoriously long winded).

There's just something to be said for having a night out with some of your best girlfriends that have known you intimately through your worst and best times. Miss you girls!


 And for those of you wondering about the shopping the next day, yes, I blew all of my money along with a little more. My favorite stop - DSW (discount shoe warehouse). Can. Not. Wait. until they come to Columbia! I also got to stop by and say Hi to my friend, Blythe and see her gorgeous remodel. For all of those I missed in Raleigh - and there were many - I'll be back soon!

XXOO


Wednesday, September 26, 2012

Door-less

Why didn't we think of this sooner!? Since we moved in to the house we've had a swinging door that led from our kitchen to our living room/dining room. For the most part it remained open towards the living room. I stored our dog bowls and some TV trays behind it but that's about it. The kids thought it was fun for a short bit to practice opening and closing it but really, it just stayed open. The exception was if the dishwasher was loud and we were watching TV.

Here it is below in some very old pictures...


As you can see, it blocks the built-in corner cabinet and causes dead space behind it. Plus it just screams, "Look at me! I'm a big white door at the end of the room!"

While my parents were here for Cole's 1st birthday, we were talking about Christmas presents for the boys. One of the things I wanted to get them was a toy kitchen. Now some people have already expressed concern questioned why I'd get that for a boy but almost everyone in my immediate and extended family cooks. My brother and uncle border on excellent gourmet chefs while many others (uncles, cousins, etc) are all excellent chefs in their own right. My great grandfather even used to sell smoked sausage and BBQ as far up as New York. So for me, it's just normal. Plus Charlie already loves to "help mommy cook" as he likes to say. But the big dilemma was where to put something that big. Then it hit me. Why not remove that door and use the space for the toy kitchen? We have absolutely no room in the kitchen for it but being right at the kitchen is the next best thing.

So before my dad left to go home, he and Daniel removed the door and it currently sits in our shed. It was super simple - simply unscrew the bottom screws and then it just slides off the top. The top section is fixed so it just sits in the top and the bottom is what holds it together. I think it took them 3 minutes. Check out how much of a difference it made!


See how much more open it looks? We can even see the entire dining table from the kitchen now. Before it was always blocked off. Now the little wooden kitchen set will fit nicely in that little nook and I've already ordered the play food and pots/pans that will reside in a nice basket beside it. I think they boys will love "cooking for mommy and daddy" for years to come! I may even put some of their toy food in the kitchen so they can "help me" when I cook each night.

Amazing how a quick change can make a huge difference. How about you? Anyone else made a quick change that transformed their room? Or had an epiphany and wondered why you haven't done something sooner?


Thursday, September 13, 2012

Yard Sale Success!

As part of Mission: Organization (see more on that here and here) I decided we needed to have a yard sale. Usually I'm too lazy, or maybe just too busy, to hassle with a yard sale but I decided we had enough nice stuff to give it a whirl. I blindly picked a date where we'd be available and penciled penned it in. September 8 it was!  Note: on that day, I learned that there was a noon USC football game. If you are from here, you know that that all life stops around football season. Seriously, businesses will shut down early if the game is early. So I was a little afraid that we'd not have much success.

The week before, I roped my husband in to helping me pull everything down in the attic. Actually, I pulled it down, he was at the bottom of the stairs since I being the control freak that I am, wanted to go through all the attic stuff to decide what stayed and went. He would have just tossed it all down to sell, and possibly thrown in a kid or pug to the pile. We borrowed three 6ft tables and put them up in our living room. Yep, that's right, we could have auditioned for Hoarders and probably been accepted.


This is how we lived for the week. Surprisingly the kiddos didn't really mess with it all that much. I think it was a little too overwhelming! My fabulous friend, Jenna, came over and helped me price everything one night. Can't tell you how much more fun it is to price things with a fun friend than sorting through it yourself. Cherry. Life. Saver.
 
I didn't do much advertising other than listing it on Craigslist the Monday before and putting out signs the Thursday morning before. I did make a point to make my signs visible and interesting...what? You know I couldn't just be boring and say there's a yard sale Saturday!


I used blinding neon poster board and cut them in to 4 pieces. Then I just printed some signs - maybe 16 in toto. For those spots in our neighborhood that didn't have poles I could staple them to, I used wooden stakes you can buy at Lowe's or Home Depot. They were easy to just pound in to the ground with a hammer. We had lots of comments on the signs so they must have worked!

What really shocked me was that we had someone actually stop by the house and ask to shop early...as in 2 days early. Really!? I had already had someone inquire about the china (see this post) through Craigslist so she came and looked at our stuff early, but she scheduled it.

Then came the morning of the big sale...we got up at O-dark-thirty (5am that is) so we could start hauling. Being the sales person I am, I had to have things organized on the tables to show case the best stuff. And as I suspected, although the signs said 7am, people were shopping at 6:15am.


As Jenna predicted, the things I thought would sell fast, never sold. The things I thought people wouldn't want, were taken quickly (like an old stereo from the late '90's!). The biggest hits were my old jewelry and nail polishes. All the other decorative items for the home were just sort've hit or miss. Maybe that's because all my friends snatched up the good stuff in my pre-sale on Friday! Yep, you read that right. I held a pre-sale for friends per their request. That's where half the money was made!

As you can see, we were in the dark for a while until the sun came up. Those hard core people bring their flash lights! My biggest advice:
  1. don't pay for advertising - there's plenty of free ways to advertise
  2. make your own signs - they are easy to read, fairly quick to make and you save alot of money
  3. price everything clearly
  4. price everything fairly - think "what's the least I could take for this?" then mark it up just a smidge so people can haggle with you. Don't think how much you paid for it but rather how much you'd take for it just to get it out of your house.

In the end we stayed open until noon since people were still shopping. The majority of what we didn't sell was donated to local Christian charities/thrift stores. I did hold back a few things that I want to try on Craigslist and eBay. Just for fun.

Wondering how much we made? $529! I was super excited considering we only spent $12.98 on supplies:
 
$4.14 poster board
$3.84 pricing labels
$5 wooden stakes (and I didn't use most of them)

Our neighbors had a yard sale earlier this year and they only made $165. Of course we had a lot more stuff but still, that's huge profits in my book! And my sweet hubby agreed that I could use this to fund the fall wardrobe for our family...me... family. I have already bought some much needed plants for our planters, just in time for Cole's first birthday party this Saturday, as well as a new bird feeder and bird seed. OK granted, that's not a wardrobe but it was something we really wanted to do before the birthday party. And of course I've already asked my mom to bring me a pair of Tom's wedges from the beach I've been eyeing for months. Good things come to those who yard sale!

So don't be afraid of that yard sale! For me, the most fun was putting it all together and having it be so successful. The money is great, don't get me wrong, but the fun of selling and organizing a Fabulous Yard Sale is what floated my boat. Yep, I'm weird like that.

Who else yard sales? Next up - thrifting. Anyone game? I'm dying to go to a few thrift stores and find some tables I can repurpose or maybe even a chair for the living room.


Friday, August 24, 2012

Rugs

It occurred to me that I never updated about the new rugs we bought earlier in the year. As you know, we have a long room that is our living and dining room. I divide the space using a chair and the rug centers the couch/living space. For so long I've used a 5x7 until one day I was looking at pictures and thought "why do we have a teeny tiny rug in this huge space?"  Suddenly I realized it looked so small and wrong! Was I blind before?

Anyway, we had a $500 budget for an 8x10 rug. I knew I was going to have to be creative on this one. All the big box stores had patterns that didn't really match our colors. Or they were too contemporary in design for me to like long term. The designer stores were too expensive. I finally found (thanks to my friend Cecelia) a discount shop in West Columbia (Doug's Rugs). Low and behold! They had what I needed for under my budget.

So home I came with two babies, a double stroller and two 8x10 rugs. Wish I had taken time to actually snap a shot of my car. A little comical to say the least. Here are close-ups of the patterns. Both had more traditional feel since that's what I currently have throughout my house, and both had the pumpkin orange/rust colors. And of course the most important, a heavy pattern so dog hair and juice spills or other toddler stains wouldn't be easily seen.


Here is a before of the living room...


And here's the after.


So much better! Now the space looks better grounded and in proportion. We went with the lighter rug in the living room since once we saw it in the natural light, it looked lighter and better with our current furniture.

What to do with the other rug? Return it? That would have been the financially responsible thing to do. But since it was still just a smidge over my total budget, I decided to try it in the back multi-purpose room (AKA man room/office/guest room).

Before...a tiny island of a rug.


And after...what feels like a larger room!


So if I have to offer any advice:
  • always add rugs to hardwood floors - it softens the room
  • consider adding rugs over carpet if you need an anchor for the room
  • ALWAYS look at scale. You can see how much difference a larger rug made in our space.
Anyone else bought a rug way too small? Any other good sources for rugs in SC you want to share?

Thursday, August 23, 2012

It's the simple things that make a huge difference

Well as I was creating a new faux console table, I decided I was bored with all my tables in the living room. Plus I had to now find a place for the old sofa table, preferably not in the shed where Daniel would have a conniption fit.

And when did I decide to do said project? Oh, Friday just before I had company coming to spend the weekend and when I had a ton of work reports due. Because you know, that's smart (not.) I work well under pressure. Game on.

By noon, every table and every accent item was somewhere in the middle of the living room. I dared not stop to take a picture since I was on a massive time constraint. At one point I wanted to breakdown in to the ugly cry but I had to shake it off and focus.

I ended up moving my office side table to the living room. As you can see, before we had a chair and the toy box (hidden in this picture) in that corner. No table.


And now...much cozier! I can't believe how well my printer table (from Hobby Lobby) looks in that corner.


And where did said toy box go? In the kid's room. As you can see from this post, I had a red metal tin to store toys in their room but it was still a little junky looking sitting right at the door. Plus I decided that they really didn't need the majority of their toys in the living room. It's not like they have to go far, it's a small house!


So that left the old sofa table to put somewhere. It was meant to be. It fits perfectly in my office space in our multi-purpose room. I now have even more room to put office-y things but still hidden and out of the way.

Now back to the fun part, sprucing up all those tables. I basically took everything down and started over, lamps included. Sort've like you do when you have to take down Christmas decorations and put your regular stuff back out. Then slowly, I started putting one item up at a time. The armoire now houses more pictures...


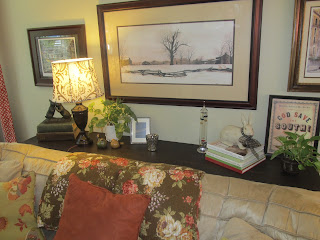
The sofa table has a new lamp (from the office) and other fun items...


As you may notice, it reached beyond the table tops and expanded to the walls. Now that we had a longer table, I could create a better gallery wall. It took moving only a few pieces around to make it fresh again.  The framed S is actually the S that was on my mantel that I put an old gold frame around. No glass, just a frame I picked up some where along the way that's been sitting in a closet.


Here it is from a slightly different angle.


The gallery wall, the longer sofa table and the reworked table tops all make it feel much cosier now. I did find a cute basket at Target that gives us a place to store a few toys in the living room. Since Cole isn't walking yet, it's easy to reach over and grab a few toys locally when I put him down to whine play.


I do have one dilemma. What to do with my mantel. I will never place a mantel above my fireplace again. I was duped persuaded by my husband this time but not again. Anyone have any suggestions? It's not easy finding pictures of a mantel decorated with a TV in the design books. I moved a few things around but it's still missing something.


So there it is. One faux table behind the sofa ended up inspiring a completely new feel for the living room. Now I am in love with the space once more. And the kids seem to like having the toy box in their room and I have extra desk space in my office nook. Now that's what I call a win-win-win.

OK your turn. What do I do with my mantel if taking the TV down is not an option?

Wednesday, August 22, 2012

Faux Sure

For a very long time now...maybe a year at least...I've wanted a true sofa table that spanned the length of my couch. Yes. I'm aware that sofa tables are not meant to do that because they usually go in an open area where they are seen. Well mine is behind my couch against a wall so I really wanted it more for table space than looks. I fancied the idea (after searching high and low on the Internet for an 80in skinny table) of making my own (like they did) but...
  1. I don't have time
  2. I don't have the energy right now
  3. I only have a circular saw and I was pretty sure I needed a table saw for cutting the correct angles for a table

So I've just dealt with the space for said time. But I finally had enough. The area just got junkier and junkier as the cords, boxes, dog crate, etc piled up "behind the couch".


It's hard to tell in the picture above (probably because I was always sure to keep it hidden in pictures) but behind that couch is scary. It really is most noticeable when you first walked in and when you sat on the couch and when you sat at the dining table and when you walked in from the kitchen. OK so maybe it was really noticeable except in this picture.

I finally decided to make my own hanging shelf like I did in the kitchen. A sort've faux console table if you will. After all, no one will really know since it's hidden behind the couch anyway. And it was fairly immediate (low labor) and much cheaper.

Off to Lowe's I went to find wood. I bought a standard 16"x96" stain grade wood  ($30) and had them cut it to my size (80"). They had cheaper lumber available but since I wasn't planning on painting but rather staining, I needed a higher quality board. I could have bought a 72" standard size for much cheaper but I knew deep down I'd miss those 8" behind the couch and regret it. Next I simply stained it with the same stain from the table project and then sanded it down a bit to give it a worn look.


I decided I didn't want a slick look (i.e. polyurethane) so I checked around and bought some wax instead.


I'm not going to lie. This stuff isn't cheap ($25!) but it's well worth it. I loved how easy it went on (simply apply with some cheese cloth, let dry and buff) and how it gives it a great muted sheen like furniture you buy in store. I knew I would need some for a dresser I plan on painting (some day) too. I only had to use a small amount for this project since I only did one side.

Then came the hanging...and by this point the boys were home. Charlie was an awfully good helper (albeit slightly scared of the "momo" or drill). Don't mind me. I'm still in my workout clothes from the morning.


Using simple brackets (3 to be exact) it was simple and easy to hang.


Don't mind the unstained end. I fixed that when I realized I had forgotten to flip it over initially. Once I moved the couch back, it was fun to start decorating! Look at what a difference the longer table makes.


You can really see the length in this wider view.


And all the pretty things I can put on it now...


And now you can see how much room I have underneath and how much cleaner it looks. I am storing my scrap booking materials and all our pictures that have yet to be organized under there for now. I'm hoping it motivates me to do something with them.


And so you don't have to scroll up again, here's another before and after:

(obviously an old picture - RIP kitty Sasha)
 

While I was at it, I made some other switcharoos in the house. More to come on that tomorrow. Hint, you can see some of it in the above pictures on the walls.

Anyone else gotten creative in the world of shelving? Has anyone used Annie Sloan paint and wax before?