Thursday, May 29, 2014

Organization Puts a Mind at Ease

Maybe it's just me but does anyone else feel like their life is out of control when things are unorganized? Don't get me wrong, I'm not one of those that labels every single thing and has it all in it's perfect spot. I mean don't even think about opening up some of my dresser drawers because you could get lost in that chaos, never to return. But in general, I like everything to have it's place. I've lived in a smaller home for the better part of 10 years now so it helps with the clutter if everything has a relatively good place to go. 

So this weekend, I had plans to rearrange our living room. It has never really felt right to me. Just average. And who wants to be average? {cue my favorite commercial right now}


More on that next week once I figure out a few things. It's a process for sure. But one that will not defeat me. 

So after I felt completely deflated and like nothing was accomplished other than cleaning the house, I decided to tackle a smaller, perhaps more satisfying project: cleaning out the art armoire. 

This used to be where I worked in our last house because I needed the ability to close it off. Since moving in to Schrallville, we've moved it in to the living room and I use it for storage, specifically for art supplies, painting supplies and sewing. It's a great way to organize all of our "arts and crafts" as Charlie likes to call them. I keep the kid's puzzles, crayons, markers, play doh, sidewalk chalk, coloring books, etc. in here.   

It was organized at one point and I used tension curtain rods to store my ribbons. But then it turned into this...


Better known as chaos. 

The tension rods were a good idea in theory but they wouldn't stay as well as hoped and were knocked down frequently. Plus they got in the way. Perhaps I have too much ribbon? Nah. No such thing. We'll blame it on the rods and location. 

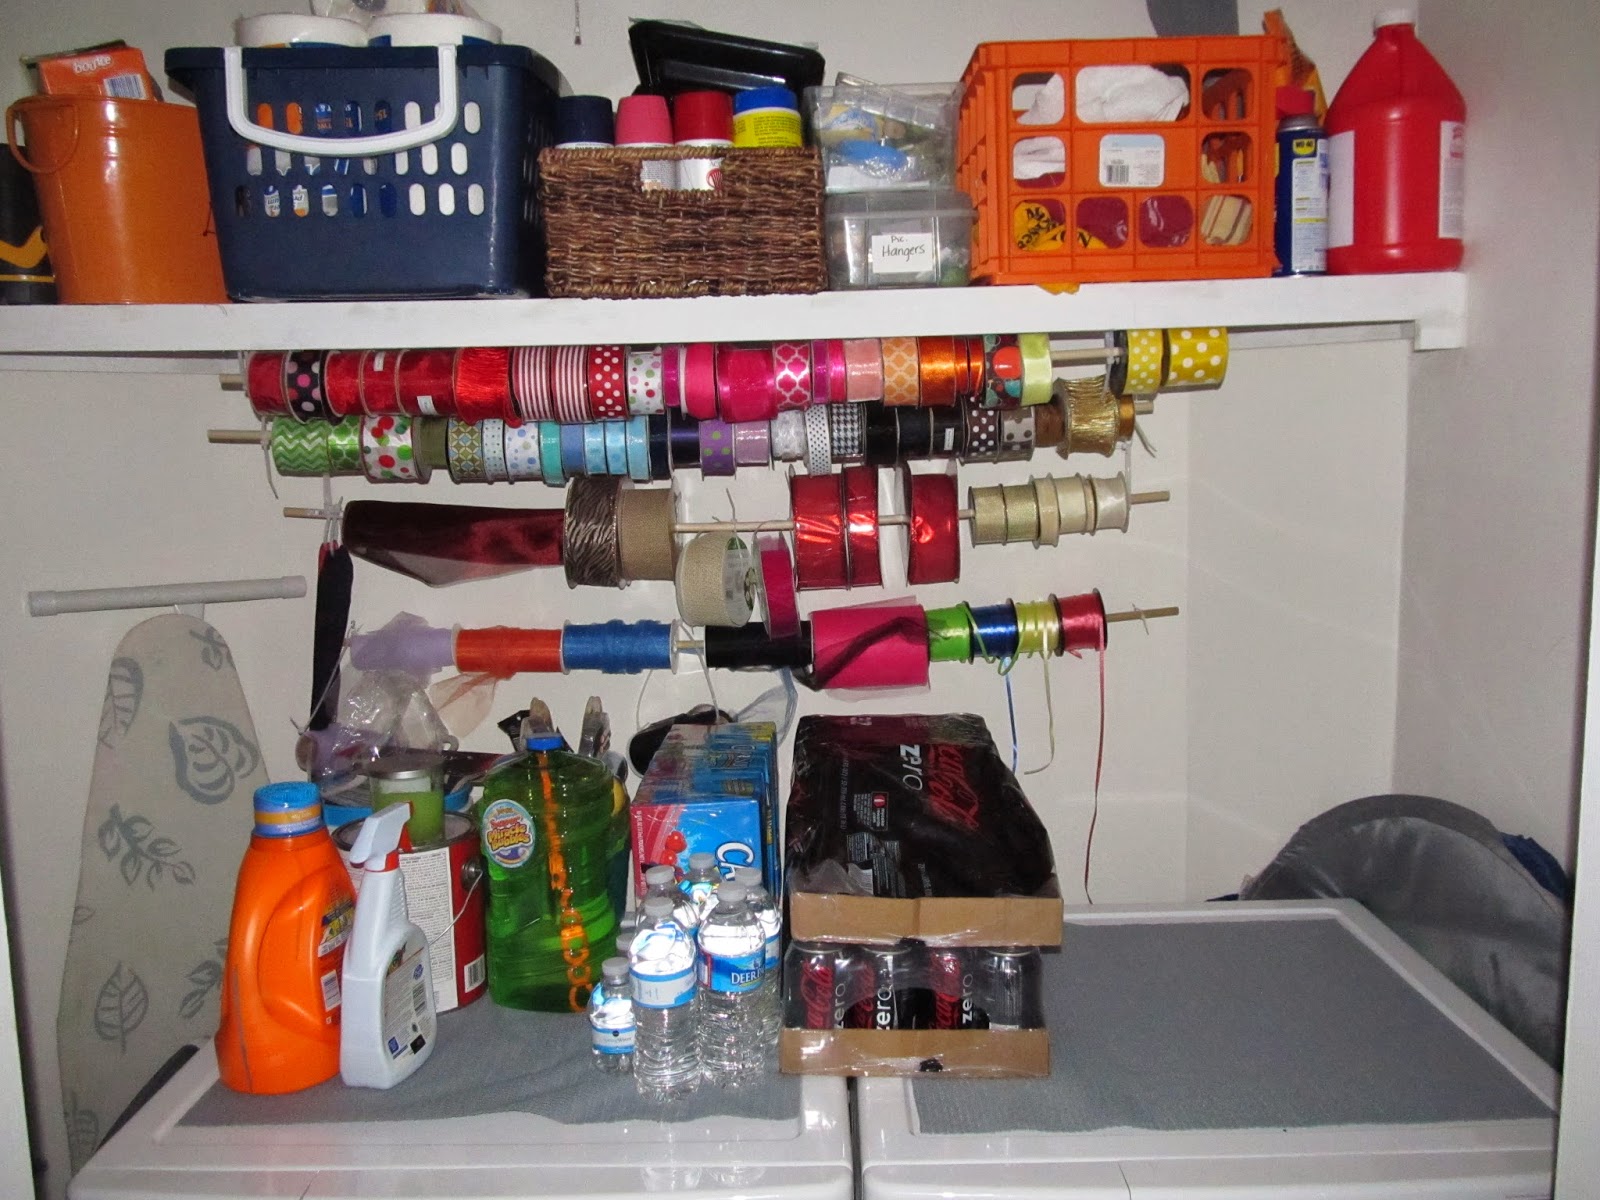
I decided to move the ribbon to the laundry room. I had this space below our shelf and behind the washer/dryer that was empty. We thought about putting another shelf there but haven't really gotten around to it. 


So that big blank space was perfect real estate for the ribbon. I bought eye hooks to hang from the wooden shelf, which just screwed in. 


Once I put up the eye hooks, I used zip ties and dowels to hang the ribbon. 


I actually tiered down the dowels so I could have access to all of them at one time. This was easy because I just used extra zip ties to make it longer. I love a zip tie. I could technically use string or ribbon but the zip ties hold the dowels better in my opinion. 

So now the laundry closet looks like this...


And my Art Armoire looks like this...


And the best part? The project was CHEAP! 

$1.57 per dowel ($4.71)
$1.18 eye hooks
$7:35 zip ties (but it's a HUGE bag because I was out)
$13.24 Grand Total (assuming you don't have zip ties)

Not bad for an hour of work. Seriously, it really helped me feel like order was placed back in my life and I could proceed with the holiday weekend. 

The laundry closet still has tons of real estate I can use with additional shelving but I'll get around to that later this summer. In the meantime, anyone need a bow or a present wrapped? 


P.S. yes, I totally organized most of it by good 'ol ROY G BIV (the top two rods)

Friday, May 23, 2014

School Buses and Wreaths

You may have noticed through a few pictures on here or by driving by our house that we've been slowly trying to make some updates to the outside, also known as the-yard-that-looks-like-no one-lives-there or the-yard-where-kids-toys-grow, because that's what it sometimes feels like. We spent the past 8 months working diligently on the inside of our house and haven't done too much to the outside. Alas! That is starting to change. 

My first few updates were just to brighten up the outside, starting with painting our exterior doors a fun yellow. Daniel kindly refers to it as School Bus Yellow or School Yard Yellow. Others, who obviously have much better taste, compliment me on the brightly colored door. It was a bold choice but that's exactly what I was aiming for - something different. But first let's talk about what it looked like when we first bought the house. Yep. Pretty bad. Do you even see a door?!


The tree is removed, leaving us with a big bald patch, and the shrubs are also gone. I'll be back with more about that later, once we finish a project we've been working on for a few weeks. But I'm digressing...back to the front door...here it is with a coat of Sherwin Williams Decisive Yellow. Name sort've fits me, don't you think?  Maybe that's what drew me to it! 


I absolutely love the color and love that it's different. Not something you can see on every other house like the red, navy, hunter green, black or the other "safe colors" as I like to call them. 

But let's talk about that wreath for a moment...


I realized that after taking down my Valentine Wreath that I didn't really have anything to put up for Spring and Easter. So off to Hobby Lobby I went. I had a few ideas in mind for options. I looked up a few on Pinterest and decided to keep it simple. 

Here is how to make one of the easiest wreaths. 

Materials

  1. straw wreath 
  2. ribbon (3 spools got me around the wreath plus more for the bow)
  3. hot glue


Start with your straw wreath and I chose NOT to take the plastic wrapper off. You can see it wasn't very expensive, only $4.99. 


Glue one end of the ribbon to the wreath then tightly wrap it around and around, having the edges slightly overlap.  


When you get finished with one spool, simply glue it down and then start with another. You will repeat this until the entire wreath is covered. Foolishly I thought two spools would do and panicked followed by me frantically running around Hobby Lobby until I found the last one left. So buy three spools of wired ribbon and avoid the drama and maybe even some crazy "does she have rabies" looks from other customers. 


Once that's done, all you have to do is either make a bow or buy a bow and viola! I chose to make a bow using 4-5 different ribbons so it was nice and colorful. Any florist could also help you make a bow if that's not your forte. 

The best thing about this type of wreath is that you can make one for any occasion...
       Memorial Day/Fourth of July - red, white and blue
       Baby Shower - pinks or blues
       Football Season - pick your team's colors

Really, the sky's the limit! 


Now since then my lovely friends have given me a custom monogrammed wooden wreath which I painted a watermelon color (another bold choice I'm told). I absolutely love it and now have it hung with a suction cup wreath holder (the big, black Hi-I'm-holding-this-wreath-up holder wasn't doing it for me). 


I put a grapevine wreath behind it to add depth (and to keep it from knocking on my door every time we opened and closed it.) I need to get a bigger grapevine but I wanted to test this one out first. 

Overall I just love how much happier the bright yellow doors make the house feel. 


I loved it so much that I actually painted the back door last week. It was not part of the original plan but I had leftover paint and decided the plain white wasn't inspiring or cheerful. This door is open all the time so the dogs have access to the backyard through their doggy door. It was just sort of bleh when it was open. But now...


Cheery! I can now enter the kitchen and see a happy yellow instead of bleh. Look how much happier and colorful it is now! 


You may have noticed the eyesore grey concrete floor on our side porch. I have plans to paint this over the summer once I figure out the best process and materials. Anyone else painted over a painted concrete floor with any success? I'm all ears! 

It looks like this now...


Not really attractive or the best color...but baby steps. In the meantime, I'll keep smiling when I see my happy yellow doors and cheery flowers! 


Tuesday, May 20, 2014

Lamb Stew (gourmet meal part deux)

I promised here that I'd show you how to use those delicious leftovers. Of course, feel free to eat it all just as it was cooked originally but I think that lamb stew is a close second in terms of delicious meals, especially in the winter. 

Lamb Stew

Ingredients
Lamb (leftover from here), cut in bite size pieces
3-4 stalks of celery, finely chopped
2-3 carrots, chopped
1 large onion, minced
3-4 potatoes (skin on), chopped in bite size pieces
leftover gravy
any other leftovers (like green beans, mashed potatoes, mushrooms, etc.) 

Directions
1) Saute the celery, carrots, lamb and onions in a little EVOO (extra virgin olive oil) just until they are tender (and mushrooms, green beans, or any other veggies if you are adding more)


2) Add the leftover gravy from the leg of lamb. This adds a ton of flavor to the stew! Then add the potatoes (but don't add the leftover mashed potatoes yet)

3) Add just enough water to cover everything. 


4) Cover and simmer 1-2 hours (basically until the veggies are done). And by simmer I mean not boiling but hot enough to be just below boiling. 

5) Add any leftover mashed potatoes if you have them, this helps thicken the stew. If you don't have any or it's still runny, in a small cup place a little water and some cornstarch or flour (the same type of "slurry" we did for the gravy here). Add just enough to make it stew like versus soupy. 

6) Add salt, pepper and garlic to taste. 

Here's a pic of mine when it was finished...if only you could smell this yummy goodness. 


Viola! SUPER easy stew! This freezes great. We actually ate a meal and then I took what was left of the stew and froze it in 1 cup containers so I could eat it for lunch as I desired. Sort've like my own frozen dinners if you will. I would serve this with some form of bread so you sop up the yummy gravy (that's a very southern thing). 

Bon Appetit! 

Monday, May 19, 2014

Gourmet meal sure to impress!

I've mentioned before that I come from a great line of cooks. My mother is no exception, despite the fact that she is spoiled now and my dad likes to do most of the cooking since he retired. :) So when she called before their visit not long ago and asked if she could bring a leg of lamb or a roast for dinner, I didn't even hesitate when I yelled said loudly LAMB! 

This is one of those dishes that she swore was super easy but I never really watched her do it so I just assumed it was complicated. Turns out my mom was right. I'm sure there is some psychological analysis that can be done from that last statement. It really is so easy to make and will surely impress anyone you serve it to. 

So without further ado, you must try this absolutely delicious and easy, yet truly gourmet dish! And here's a little teaser...there will be another post about how to handle the leftovers next.

Roasted Leg of Lamb


Ingredients
1 semi-boneless leg of lamb (preferably US because of the milder taste but not required)
salt
pepper
garlic powder
fresh rosemary
2-3 Tbs cornstarch or flour


How to prepare the meat
1) Remove the plastic coating and pat dry.


2) Remove any excess fat from the lamb but you'll want to leave some for flavor and moisture. We just trimmed a little bit. 


3) Spray the bottom of a glass baking dish with PAM or some non-stick spray. We used a 9x13 glass baking dish. You don't want to use a roasting pan because it may dry it out too much. 

4) Chop fresh rosemary (~2Tbs). We just went outside to my rosemary plant and chopped a few sprigs. Remember you don't want the hard stem, just the "leaves"


5) Coat BOTH sides in salt, pepper, garlic powder and the chopped rosemary. And when I say coat, I mean you want it like a crust. Now is not the time to scrimp! The rosemary won't be enough to coat so just spread it evenly between both sides. 


6) Bake at 350 degrees for 20 min per pound (less if you like it medium rare). If you want to check the temperature, it should come out where the beef section is on your thermometer. 

7) FOR THE LAST 20 MIN OF BAKING pour 2-3 cups of water in the bottom of the pan. This is going to be the base of your gravy. 

8) Remove the roast and place on a plate. We covered ours lightly with foil to help it stay warm while we finished making gravy and setting the table. 

9) When you slice the meat to serve, slice it against the grain so it's more tender.

Here's a picture of ours as it was resting...seriously I'm drooling as I see this picture. If only you had smell-a-vision so you could truly appreciate how the house smells when this is cooking. D.I.V.I.N.E. 


Gravy for the meat (an absolute must!)

1) You can transfer the drippings and water from the pan over to a pot or simply place your glass baking dish on the stove and cook the gravy in it (which is what we did). Place it on medium heat and start to stir so you get all the little drippings that have stuck to the dish moving around and unstuck. 

2) In a small cup, add 3 Tbs of flour or cornstarch to approx 1 1/2 cups of water and whisk so that it's nice and smooth (no clumps). This is what you'll use to thicken the gravy. We call it a "slurry"

3) While continuously stirring, add the slurry little by little to the drippings until it's slightly thickened. You don't want it super thick like biscuit gravy but you don't want it watery like au juis. It should be somewhere in between. We didn't end up using all of our slurry because it wasn't necessary. 

4) Taste and add salt, pepper and garlic powder as needed. Ours needed a little of all three.  

5) By now your meat has rested and there are probably some juices at the bottom of the plate it's sitting on - toss those in to your gravy too! It's just that much more added flavor! 


We served our lamb with home made mashed potatoes since we had gravy for the potatoes. It would also be good with rice if you're not a potato fan. We also had green beans and a fresh salad from my dad's garden (boy do I miss a good garden!). 

I should have taken a picture of our plates but I was a bit too busy running around getting things on the table while managing the toddlers. Trust me when I say it's super delicious. I requested this every birthday and Easter growing up. 

The next post will be about what to do with all the leftovers, including those potatoes! So don't toss anything out! You can use it to make an equally delicious dish that is great for freezing. 

Bon Appetit! 

Sunday, May 18, 2014

Hippity-Hop

Easter has come and gone...Mother's Day has come and gone and Memorial Day is almost here. I seriously cannot let myself post a blog update on one holiday out of order. I have to do it in order. It's a weird quirk. 

So without further ado let's talk about our Easter albeit a few weeks late. 


I had already planned on taking part of Good Friday off and we invited their best little friends over for an Easter Egg Hunt. There are "the blondes"...


and "the brunettes"...


And of course Miss Ava. Cole loves him some Ava. Here they are all waiting for the hunt to start. 


I took 150 eggs and stuffed them with candy the night before while I was watching TV. That may seem like a lot but when you have 5 kids on the hunt, you want it to last longer than 2 minutes. I also made buckets with their names on them (thanks to the Dollar Store and a sharpie). They were seriously SO excited! As I was hiding the eggs (and before the Majures got there), Charlie and Cole followed me. It was their first true Easter Egg Hunt. Charlie was literally shivering with excitement and kept saying "this is the best day ever!!" Talk about a boost to a mom's ego! 


And off they went! 


I love this picture of Cole near a tree. It makes me want to scoop him up and give him a giant squeeze. 


I hid eggs all over in both front and back yards plus on the porch. It was a giant free for all and because there were so many to find, everyone felt like they were getting a lot. 


I did hide one special egg.  I told them that the special egg was a special reminder of why we celebrate Easter - Jesus. On the third day, the tomb was found empty so that's why the special egg is the empty egg (inside it said "He is risen!"). Cole and Christopher found the special egg up in the swing set. They were so proud! 


Charlie surprised me with how "in to" the Easter egg hunt he was - I mean he was all about getting as many eggs as he could. He is fiercely competitive and this was right up his alley. Check out his bucket...he found a pocket of eggs under the magnolia tree and was super focused. 


They all had a blast when the last eggs (or so we thought) were found and we headed back to divvy up the loot. Charlie could barely carry his bucket it was so full. 


When it was all said and done we shared all the eggs so everyone got the same amount. 


Once again, Charlie surprised me with his focus. He took all his eggs, emptied the candy out one by one in a pile and then put the candy back in his bucket. That's all he wanted to do. I mean just look at that happy smile! That expression is total happiness. 


Then there was Cole who opened each of his eggs and ate as fast as he opened. #opposites  Seriously, he had chocolate dripping off his chin and his mouth was stuffed. 


I was so thankful that the rain held off that day because it sure did pour the rest of the weekend. But no worries, I had already planned another fun activity for a rainy day - dying Easter eggs! Last year this was a huge hit for both boys so it was no surprise this was a hit again this year. 


I strategically planned it right after naps so they would wake up and it would instantly take the cranky's out. They each had their own station. This mama ain't stupid. The last thing I want is a flying cup of dye when they start to fight over the same color! 


Cole had a blast being able to "do it his self". I heard "LOOK MOM! It's blue!" or "LOOK MOM! It's pink!" He talked the entire time and loved it. 


Charlie was even more in to mixing colors and seeing what he could get. I just doing "arts and crafts" as we call them, with the boys. I want my boys to tap in to their creative sides and keep that imagination growing. As you can see, I don't really worry if their hands and fingers get in the dye. I put down Press N Seal all over the island so that if it spilled or dripped, it didn't matter. 


I think the eggs turned out beautiful and we ate a good majority of them the next day for part of our Easter Sunday lunch. Slightly colored deviled eggs make me smile. 


Here they are all dressed and ready for church on Sunday morning. They were super excited that we were going to ride the bus to church. That's how I tore them away from their Easter baskets to get dressed; the promise of riding a cool bus. Really it was us parking in a shopping center beside our church and riding the shuttle over to make room for all the visitors. But to them, it was a super fun adventure. I love that they love going to church on Sunday morning and as Charlie says "learning about Jesus". 


It was a super fun weekend filled with all kinds of activities. Of course I didn't even think to get a family picture that weekend. Go figure! But perhaps my best memory, aside from Charlie saying at each activity "this is the best ever, mom!" was when he told their sitter on Monday that we celebrated Easter that weekend because "Jesus died and rose from the dead!" I was proud he remembered the real reason and wasn't just caught up in the candy and eggs. Boy do they grow up fast!!

See mom! I did get pictures posted for you...just a few days weeks late.  

I think the Easter Egg Hunt will have to be an annual thing. It was just too fun to put together and watch not to. Anyone else have a favorite annual tradition for Easter?