Tuesday, December 20, 2011

Ho ho ho!

Well it's only 5 days until Christmas! Do you have all your shopping done? Shopping isn't an issue for me...it's finding time to wrap the presents that seems to get worse with every child added to the family. Point in fact, I should be working on that now but instead I'm playing on the internet and posting this. Anywhoozle...my beloved Hubby tends to forget about the stocking when he's shopping. He never actually did the Santa Claus thing so it's a bit foreign to him. So for those of you who may be handicapped in the same way...here are 150 IDEAS FOR STOCKING STUFFERS!
(I would love to say I created this list but I got it from jennasjourneyblog.blogspot.com via pinterest and made a few tweaks)

1. $5 gift cards (Starbucks, McDonalds, Amazon, Borders etc).
2. A favorite candy (I love dark chocolate)   
3. Decorative cupcake liners    
4. A favorite magazine
5. Camera strap cover
6. Packets of flower or herb seeds for planting
7. Personalized stationary
8. Slipper socks
9. Silly putty
10. Rubber coated paddle attachement for a mixer
11. Monogrammed iPhone Case
12. Nail polishes
13. Sharpie Pens or fun colored pens
14. Chapstick
15. Hair bands
16. Small crosswords puzzle book
17. Crayons
18. Body wash
19. Piggy Bank with coins
20. Measuring Spoons
21. Clip on book reading lamp
22. Measuring cups
23. Cute wine stopper
24. Scarf
25. Stickers
26. Monogrammed coasters
27. Lottery tickets
28. Deck of playing cards
29. Rubix cube
30. Loofa
31. Hair clips
32. Cuticle set
33. Jewelry
34. Batteries
35. Cooking extracts - vanilla, mint, orange etc.
36. Mittens
37. Scented candles
38. Bookmarks
39. Fishing lures
40. Knitting or Crochet needles
41. Lotion
42. Play Dough
43. Golf tees or balls
44. Matchbox cars
45. Memory card
46. Cd's
47. Tools
48. Wash/Dish rags
49. Diaper genie refills (you laugh, but those go fast in our house!)
50. Specialty olive oils
51. Eyeshadow
52. Unusual pastas like red chili linguini
53. "From the Kitchen of" labels
54. Gardening gloves
55. Tickets to the zoo or aquarium   
56. Address book
57. An orange - to shape out the toe of the stocking!
58. Ice scraper
59. Small digital camera
60. A teasing comb for all the southern girls
61. Cookie cutters
62. A good book
63. Retractable ID or key holder
64. Makeup bag
65. Nice wooden spoons
66. Gift card to go see a movie
67. USB Drive
68. Small photo frames
69. Wallet
70. Personalized water bottle
71. Speciality teas    
72. Garden markers (for herbs etc)
73. Scented antibacterial kitchen hand soap
74. Pumice stones
75. Travel sized games (connect four, uno, etc)
76. Gourmet spice mixes
77. Small sketchbook
78. Fridge magnets
79. Stencils for crafting
80. Tickets to go see a performance
81. Kid paint set
82. Extra Wii controllers
83. Small calendar for your purse/backpack
84. PJ's
85. Wristlet to hold a small digital camera
86. Wine glass charms
87. Freezable teether's
88. Colored Post-it Notes or note sets with magnets for the fridge
89. Monogrammed onesie or tee
90. Money clip
91. Set of markers
92. Gourmet hot chocolate    
93. Ring holder
94. Wine aerator
95. Cufflinks
96. Pedometer
97. Personalized purse mirror
98. DVD's
99. Cell phone car charger
100. Child sized harmonica
101. Luggage tags
102. Personalized coffee cup
103. Travel alarm clock
104. Charm Bracelet or charms   
105. Personalized mom bracelet or necklace with children's birthstones
106. Perfume/Cologne
107. Speciality chocolates
108. Fun costume ring (Steinmart has good ones)   
109. Cute umbrella
110. Earbuds
111. Flower bulbs
112. Monogrammed baby wipes case
113. Passport holder
114. Raw honey or sorghum molasses    
115. Small digital picture frame
116. Webkinz
117. Snow cap/hat
118. Digital luggage scale
119. Chalk
120. iTunes giftcard
121. Digital measuring tape
122. Bubbles
123. Watch
124. Wine thermometer
125. Tickets to the zoo
126. Speciality coffee such as this one
127. Bath toys
128. Monogrammed burp clothes
129. Makeup brush set
130. Binoculars
131. Barbies
132. Child "character" flashlights
133. Jewelry box
134. Recipe cards (I ordered mine from personalizationmall.com)
135. Swiss Army knife
136. Belt
137. Small lint roller
138. Key chain
139. Baby rings to attach toys to a carseat
140. Coloring book
141. Birthstone earrings
142. Throwback candy - Pez dispensers, pop rocks, nerds, fun dip.
143. Kindle
144. Scrapbooking supplies
145. Personalized fortune cookie (you can have your own message put into them)
146. Universal remote
147. Hand sanitizer
148. Silly Bandz
149. Family Christmas ornament
150. A handwritten note from Santa

Any of the options you can "google" or "bing" and find multiple places to order.


God gave His greatest gift to us
on that first Christmas Day
and may the wonder of it
always guide and light your way...
Merry Christmas!

Friday, December 16, 2011

Tips from a semi-pro

I had to add the "semi" in there because let's face it, I'm not a pro yet. Wondering what I'm talking about? Mommy-hood! I would like to think that I have a bit of experience in recent months now having a 3 month old and an almost 14 month old.

See that's me with my Peanut and Chunky Monkey


I've tried and tested lots of gadgets, gimicks and otherwise interesting baby items in the last two years. Here is what I've learned...starting with designing the nursery.

The Nursery
  1. Don't buy an expensive rug. We've gone through 3 now. The first the dog threw up on. Charlie threw up on the second one (there was no getting out processed milk and cheese)...and now we have a cheaper rug. Also don't go with high shag/pilings. Too hard to clean and get out spills. And trust me, there will be some! So go inexpensive for a while.
  2. Don't hand make a bumper because it's just for decoration and you'll not use it in 2yrs anyway. I think those of us with designer hats love to create with fabric but for the time and cost for as little as you'll use it, buy one. There are plenty out there that will fit in your scheme.
  3. Look for cute sheets and ONLY register for those. I found most of mine online. I made the mistake of buying/registering for sheets that were cute but didn't match. Guess what. The designer in me won't put them on the bed because it irks me that they don't match!
  4. Create a spot for play and reading as you're creating the space because you'll use it sooner than you think.  I didn't take this in to consideration and wish I had gotten a toy chest in the beginning.
  5. Baskets, baskets, baskets! Such a great thing for storage and kids can get things out of them easily.
  6. If you can help it, don't put the crib near the window. They will not only pull on blinds and curtains but the sun will wake them up or make it hard for them to go to bed.
  7. When/if you make curtains, line them well so that you can close them and block out light. Trust me. You'll want this if you have one that rises with the chickens!!!
  8. Invest in a cute sound/light machine for the crib. Works like a charm to distract when you need them to settle down for the night.
  9. Use a dresser or other similar item instead of a changing table. The changing table is practical but in the end, you can't really re-use it when they get older.
  10. If you choose to do a "theme" just remember that you might be changing it sooner rather than later. They grow fast! So keep that in mind when selecting your curtains and other non-crib fabrics and accessories. Will it be easy to find bedding to match them when you move to a toddler or "big boy/girl bed"?

Now on to what seemed was my biggest and most expensive learning curve...
The Diaper Bag
When I started looking for a diaper bag I was determined to find one for me, not to match the baby. So first decide if you care if it's a true diaper bag or if you want something you can use as a diaper bag. Truth be told, you don't need tons and tons of room but you do need something like a large purse. Currently, what works for me - two large purses that have good pockets I found at TJ Maxx. I interchange between the two based on my mood and love them. Both can fit on my shoulder since I now usually have a baby on each hip. And I disagree that you need one that closes at the top. I never close mine because you don't always have two hands free to open it up! Plus sometimes you need to grab something fast. Here's what you'll ultimately carry around:
  1. 2-3 diapers (register for a "diapees and wipees" carrying case and they fit a just enough) 
  2. small thing of wipes (Target has them in the travel section so I use those small packets)
  3. bags (like the doggie poop bags) for putting dirty diapers in and it fits in the diapees and wipees case
  4. bottle and formula or breast milk (best if you have a pocket for this but not required).
  5. hand sanitizer or something similar (wet ones travel size are good to have on hand). I have this in my make-up case anyway.
  6. pacifier (or I just carry it in the carrier most of the time). Check these out - my boys LOVE THEM and you never lose them: wubbanub  
  7. changing pad (I have one that rolls out that is terry cloth but I rarely use it! But it's basically a terry cloth that has string around it to keep it in place and is handy to have "just in case")
  8. MAYBE a toy but most of the time I just keep some in a basket in my car and grab one if I need it (i.e. doctor's office)
  9. for the first 2 months - a onsie in case they blow it out (or like me, just keep one in your car because at that point you're going to want to go home anyway!)
And when they get a little older:
  1. baby food if needed but usually only a jar so it doesn't take up a lot of space
  2. a snack (I use a cheerio container that I can just drop in my purse if I know I might need a snack)
  3. plastic cover for tables if you eat out

So you see, most of what I listed is easily carried in a large purse. It seems like a lot but it's not really. So before you automatically assume you need a diaper bag, think about if you would rather find a cool purse that could work as a diaper bag. I bought 2 diaper bags that are Petunia Pickle Bottom and I rarely use them. I can fit more in my large purse and it's easier to access than the diaper bags! Not that there is anything wrong with these and I still carry one in the spring, but I didn't truly need a "diaper bag" in the end.
 
Just think about how you use your purse, what you want to carry in it (yours and baby stuff or just baby? have two bags or just one?) and then shop around. Think simple - which is why I just carry around one bag. And what do I do for church and other places that I need to leave a bag for the boys? I bought them each a pre-school backpack from Pottery Barn. Fits just enough for each one.

So I hope those tips help if you are expecting or know someone who is expecting. Of course I've learned so much more but these are two topics I made the most mistakes in!

Wednesday, December 7, 2011

White wine and lemon chicken

Ever struggle to answer the age old question "what's for dinner?" Boy I do. And the Hubbie is no help either. He'll tell you what he DOESN'T want but isn't much help for ideas. Since starting back to work, which means I have to be that much more efficient, I have started creating a list of dinner options. That way one of us can look at the list and pick an item and I know I have all the ingredients. Plus when I shop, I can usually make sure I get everything I need easily.
This week our menu looked like this:

  • Vegetable Beef Stew with beer muffins
  • Chicken Pot Pie (Daniel's favorite comfort food)
  • Chicken Noodle Soup and grilled cheese sandwhiches (a favorite of Charlie's)
  • Chicken Florentine ring
  • Pork Tenderloin and veggies
  • Spaghetti
  • Shrimp Creole (a client brought it over and we froze some)
  • Soup and Sandwiches (usually butternut squash soup and paninis)
One of the things I love to do when I have 5 minutes of down time is to watch the cooking channel. OK. I'll admit it. Since I became pregnant with Cole, I am addicted to it. My favorite shows are The Next Iron Chef America: Super Chefs, Cupcake Wars, Cook Like a Rock Star (I think that's what it is called with Chef Anne Burrell), Restaurant Impossible and Chef Hunter. The things the Iron Chefs can cook in those challenges is insane! And the cupcakes from Cupcake Wars!? I'd love to taste some of the dishes and cupcakes.  But I digress...

When I was sitting down to errr...express some nourishment for Cole (i.e. pump), I started watching the Barefoot Contessa. Or at least I think that's who it was. I don't usually watch TV during that hour so I could be wrong. Anywhoozle, she was putting together a quick dinner party menu. I had enough time to catch the main course - baked chicken with white wine sauce so I thought I'd give it a shot. Now you know in those shows they "sort've" show you how and "sort've" give you the ingredients so you "sort've" have to guesstimate sometimes.  

I have to say this dish was pretty tasty although I would tweak the recipe a bit to accomodate my taste buds. So the below recipe is Anna-vised. The Hubbie gave it two thumbs up so it's something I could fix again.  

Baked Chicken with White Wine and Lemon Sauce

Ingredients
2 chicken breasts (skin on, bone in)
1/2 cup white wine
1/4 cup lemon juice
1-2 shallots, finely chopped
1/4 cup half & half or heavy cream
1/2 stick butter, cubed
salt and pepper to taste

Instructions
  1. Salt and pepper both sides of chicken breasts. In a cast-iron skillet, add a few TBS of EVOO. Once oil is heated, add chicken breasts, skin side down. Cook on med-high heat for 5-7 minutes then turn and cook an additional 3 minutes. This will get the skin side nice and crispy before it goes in the oven.
  2. Place chicken and skillet in 375 pre-heated oven (no need to cover) and cook for about 20-30 minutes or until juices are clear
  3. For the sauce, add the shallotts, white wine and lemon juice to a pan and reduce on medium heat to about 2 TBS. In other words, cook it until there's only about 2 TBS left. If you over reduce it, just add a little more white wine to it.
  4. Add the cream and then remove from heat.
  5. Add the butter and melt then add salt and pepper to taste.
  6. Remove chicken from skillet and spoon sauce over each breast.
Now depending on your tastes, you may want to add less lemon juice and more cream or vice versa. The sauce is a very lemony sauce so don't expect a creamy, mild taste. But once it's paired with the chicken, it's delicious! I served this with steamed broccoli (the sauce was really good on the broccoli too) and mashed potato casserole.

Hope you enjoy! (If you want any of the recipes listed in my menu, shoot me an email or post a comment and request it).

Bon Apetit!

Thursday, November 24, 2011

Thanksgiving Uh-Oh

Well I guess I jinxed myself in my last post about not posting the bad recipes. Of course that was in the middle of me baking my casseroles and thought that was the easier part. So here is my Thanksgiving cooking debacle...


I decided to bring sweet potato casserole and mashed potato casserole for the main meal. Made them last night and put them in the fridge thinking I was all smart cooking ahead. I took them out to warm to room temperature and then put them in the oven this afternoon. We were scheduled to be at the Bliss house around 1pm. Well at 1:10pm the sweet potato casserole wasn't done yet, probably because I put it in a deeper dish. I was using my grandmother's recipe so I hadn't made it before. Once it was baked and set in the middle I was supposed to put marshmellows on top and bake for 10 more minutes. Checkety. Check. Check. 


I went about my business while it was baking again, you know laundry, straightening, taking advantage of 10 minutes free. Oh and at this point I had sent Charlie and Daniel on to the Bliss house so they could visit. Cole and I were to follow when the casseroles were done. 


I open the oven and...hmmm it smells a little like smores...that's not good. I kid you not...the marshmellows apparently turned in to popcorn and had jumped off the casserole and were now dripping down in to the oven. I think maybe 3 were left and they were burning. Nice. 


I pulled it out and the word "mess" doesn't even do it justice. I scraped off the remaining marshmellows and it was like glue. I was scared to put on the lid because I knew as soon as it cooled, I would never get it off again! So I took the casserole with no top or foil or wrap and sticky marshmellow glue dripping down the edge and a little left on top. Stupendous. And to top it off, the mashed potato casserole was a little over cooked. 


Here's a shot of the oven and pot...


Notice the Easy-Off beside the dish. I had to use it not only in the oven (which I decided to let soak over night) but also on the dish itself. It was either that or throw it away. 


So I called my mom on my way to the Bliss' and told her what happened. We couldn't figure out what went wrong. Then she says "that's why I just make a pecan and brown sugar topping for mine." Now she tells me. So I blame her for this year's Thanksgiving debacle. Because I'm mature like that. 


If you need me tomorrow, I'll be cleaning my oven. 


What about you? Any funny stories to share from today?

Thanksgiving goodies

Happy Thanksgiving everyone! First, let me say that I am so thankful to have such a wonderful family. Rather they are near or far, I love every single one of them, especially my three sweet boys (Charlie, Cole and Daniel). They bring such joy and fun to my life.


So on this beautiful Thanksgiving Day, do you ever wonder what others are having for their meal? Or what everyone is busy cooking today other than a turkey? Well, no surprises here, I'm baking. We are heading to The Bliss' house for a nice meal and I'm bringing mashed potato casserole, sweet potato casserole, chocolate chip cookies and an apple pie. I wanted to bring more pies but we don't need them since it will only be 8 of us. (can you tell I'm used to cooking for the Rothrock clan? We usually have about 20-23 people for Thanksgiving!) 


I thought I'd share a few new recipes I've tried recently that have been a success (no use posting the icky ones, right?). So here you go...oh and both of these came from The Chew (ABC show). 


Chocolate Pumpkin Pie
(I was skeptical about this one. I'm not a big fan of pumpkin pie to begin with but 
Daniel loves them so he asked me to try it. It's very good but very rich!)


Ingredients
1 Pillsbury pie crust
6oz semisweet chocolate
3oz bittersweet/unsweetened chocolate
14 oz can pumpkin
3/4 cup light brown sugar
1 Tbs cornstarch
3/4 tsp cinnamon
3/4 tsp ginger
pinch of ground cloves
1/4 tsp nutmeg
1 1/2 tsp salt
4 Tbs unsalted butter
12 oz evaporated milk
3 large eggs
1 tsp vanilla


Directions
1. In a double broiler, melt the chocolate and butter. 


Don't know what a double broiler is? Take a pot and fill part way with water. Place another metal or glass bowl on top of the pot (be sure water is not high enough to come in to the top pot). Bring water to gentle boil and place ingredients in top bowl. The heat from the bottom will slowly melt the top bowl. Just be sure you don't get any water in the top pot, especially with chocolate! If your chocolate starts getting too hard or thick, bring the temperature down a touch.


2. Mix all the other ingredients together then fold in the melted chocolate mixture. 


3. Place pie crust in pie pan then place pie dish on a baking sheet. Pour in pie mixture and bake at 325 until center of pie has set (about an hour, although mine took a bit longer). Refrigerate until cooled then serve with whipped cream. 


_______________________________________________________________________


Gourmet Chocolate Chip Cookies


(let me first say that I thought Nestle Tollhouse's recipe was always the best until I tried this one. It's very similar but some of it is in the technique, which I never knew!)


Ingredients
2 cups minus 2 Tbs cake flour (or all-purpose)
1 2/3 cup bread flour
1 1/4 tsp baking soda
1 1/2 tsp baking powder
1 1/2 tsp coarse salt
1 1/4 cups (2 1/2 sticks) unsalted butter, softened
1 1/4 cups light brown sugar
1 cups plus 2 Tbs sugar
2 large eggs
2 tsp vanilla
2 packages dark chocolate pieces (at least 60% cacao content)


Directions
1. In a mixer, cream butter and sugars together until very light, about 5 minutes on med-high speed
2. Add eggs, one at a time, mixing well after each addition. Stir in vanilla. 
3. Reduce speed to low, add dry ingredients and mix until just combined - only 10-20 seconds!
4. Fold in chocolate pieces
5. Preheat oven to 350 and line a baking sheet with parchment paper. Scoop generous golf ball size mounds of dough onto baking sheet. Bake 15-20 minutes until just barely brown.


Dough can also be kept in refrigerator for up to 72 hours and baked in batches if you don't want to bake them all at once. You can also garnish the cookies with a sprinkle of sea salt before baking for a salty-sweet taste. 


Then eat with a big napkin and milk! 
_______________________________________________________________________


So those are some of the things I've been making this week. Of course I am still cooking and baking tomorrow and loving it! Maybe I'll post my dinner recipes tomorrow. 


What did you make for Thanksgiving? What's your favorite dish? I would love to hear so let me know!


Bon Apetit!

Friday, November 18, 2011

Vampire's beware! (pasta dish)

VAMPIRES BEWARE! You can probably guess by the picture that this is a recipe with lots of garlic but that's what makes it so yummy.

There's a few things that I've learned this time around (meaning this pregnancy/post-pregnancy). One of them being that I must have a creative outlet of some sort. For me that could be scrapbooking, painting children's furniture/artwork, cooking, baking, decorating and sometimes gardening. I used to garden more but with two babies, it's hard to watch them in the yard, sometimes the house is easier.

Anyhoozle, the point of that is to say that I've become addicted to the cooking channel and started experimenting with more dishes lately. Specifically I try the ones from The Chew. I was on top of all their shows but now I'm about 1.5 weeks behind...which means I'll be watching ideas for Thanksgiving dishes AFTER Thanksgiving. Ugh. If you want some new recipes, check out their site. Several I've tried have been great.

This dish by Mario Batali (with my own tweaks) is SUPER easy, quick to make and very tasty. It got two thumbs up from The Food Critic (aka the Hubby). It will take you about 30 minutes total (including prep) and serves 8. Now these amounts below are fairly accurate since I followed Mario Batali's recipe but honestly, I didn't measure when I made it. So if you like sun-dried tomatoes, add 2 jars. If you love greens, add more spinach. You get the picture!

Tip: if you don't drink wine, buy the little 4-pack bottles found at the grocery store. Usually recipes only call for the amount that's in one of the little bottles and the rest you can save for future recipes. They run from $6-12 and are easy to store.

Sun-Dried Tomato and Spinach Pasta

1/4 cup EVOO
1 small jar (or 2) oil-packed sun-dried tomatoe halves (drained & thinly sliced)
1 box whole grain thin spaghetti
6 garlic cloves, minced
1/4 cup (ish) of dry white wine
2 Tbs salt
4 cups baby spinach (pick off the stems)
1 tsp chili flakes (optional)

Instructions
Bring 8 quarts water to boil. While the water is heating do the following:
  1. heat the olive oil in a saute pan over medium heat.
  2. add the garlic and cook until lightly golden brown.
  3. add the sun-dried tomatoe pieces and wine, bring to boil and remove from the heat
  4. take several large sips of the white wine - oh wait, that's my mom's recipe version
Cook the pasta in the boiling water (be sure to add the salt to the water) for 1 minute LESS than the package instructions call for.

Add 1/4 cup (or 1 ladle worth) of the pasta water to the olive oil mixture. Add the chili flakes (optional).

Drain the pasta then add it to the olive oil pan. Add the spinach and toss well. Toss over medium heat for about 30 seconds, until the pasta is nicely coated.

Serve hot - garnished with fresh parmesean cheese and/or breadcrumbs.

Bon Apetit!

Wednesday, September 28, 2011

Meet our newest member!

Allow me to introduce the newest member of our family - Cole Hamilton Schrall! He was born a few days early...September 15 to be exact and weighed in at 8lbs 8oz and 20.5 inches.


He came in to the world a bit early - I was scheduled to have my c-section on Monday, September 19 and had everything planned out. I still needed to clean my house, get my bag packed, make some food and wrap up a few things at work. Well he had a different idea. On Wednesday, September 14, I started having what I thought were Braxton-Hicks contractions around 3pm. They went on and off throughout the afternoon. I even went to see some furniture being delivered for a project I'm working on and my friend said "uh, you OK?" to which I replied "well, I am as long as he doesn't fall out!" because I was pretty sure at any minute he might and I think he was worried too since I wasn't really standing upright at that point.

The contractions got more consistent as the afternoon/evening went on. By 8pm or so they were about every 5 minutes but not super strong, just very uncomfortable. I finally called the doctor at 11pm and he said "just take some Ibuprofen and wait a few hours and they should go away" since I wasn't dialated yet. Sounded reasonable to me. Ummm...not so much. By 2:30am after being up the entire time (and Daniel had been up for 23hrs straight at this point) he looked at me and I said "OK, call it" and off we went to the hospital. Somewhere in there we (and by we I mean me sitting on the bed and Daniel sorting through my clothes and toiletries) managed to pack my hospital bag.  By 3:30am the doctor on-call had already called back and said to schedule my c-section for 5am that morning. I busily starting emailing and calling people (yep, at 3:30am) to wrap up all my loose ends. I was glad that the doctor on-call was my 2nd favorite in our practice. If I couldn't have my doctor, I would have chosen him.

And a cute side story - I call my mom at 3:30am and say something like "going to need you to hit the road tomorrow! Time for a baby!" to which I got this response "who is this?" Nice. "Uh mom, it's YOUR PREGNANT DAUGHTER!"     She claims says that they get calls at all hours of the night about the bed and breakfast still so she was expecting one of those calls when the phone rang.

So far, he's been a great baby...well minus the fact that he likes to eat EVERY TWO HOURS almost like clockwork. I'm hoping that may start to fade and we can move to 3hrs soon. He's also a little gassy at night much like his big brother was but not quite as bad.

Here are a few more pictures to mark the occasion...

my great friend Jaime had this stork waiting on us when we arrived

sleeping peacefully - he has a head full of blonde hair too

his first bath - which started out well...

but then we realized it wasn't quite as fun!
 
And in the photo below...note the worried look of daddy with his protective hand and the crazy look of his big brother. ATTACK!

being introduced to his brother at home...

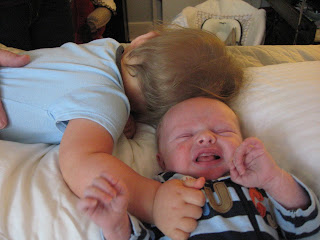
We attempted (mighty loftily I might add) to get pictures of Big Brother and Little Brother for the birth announcements but that didn't go so well. Charlie really just wanted to poke and hit Cole in the head. Hmmm...sign of things to come? 


Cole: "save me!!!"

finally Charlie gave him a little hug. So sweet!

And not to leave him out - a picture of big brother being his normal goofy self (this is just after his 1st haircut)


So that's our newest little peanut. We now have a peanut and a walnut to chase after. I'm so blessed and thankful that my parents came for 2 weeks to help out! What will we do when our security blanket (AKA my mom) leaves in a few days!?

Wednesday, September 14, 2011

Curb Appeal

When I was scrolling through our pictures not long ago, I came across the before pictures of our front and back yards. I was shocked! I had forgotten how bad they were just a mere 4 years ago. So I thought I'd do a quick before and after of the yards from this spring. Fair warning, this post is full of pictures!

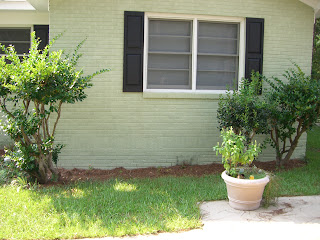
Here's a move-in day shot of the yards...obviously we didn't buy it for it's curb appeal. You'll note there is not a lick of landscaping other than the over-grown bushes trees on the corners.

front shot of house


close-up of the front

Notice in the picture below the hideous metal screen/glass door and the oh-so-loverly gas meter in the corner. What you can't tell is that behind that white door is a hollow outside door. I think they just used an interior door instead of a true exterior. It was horrible!


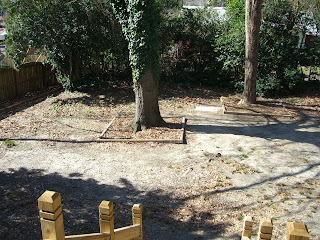
And then there was the backyard...brace yourself.


So basically, the backyard was dirt and weeds. The only thing that had been added was the deck. Hideous. I die. And not in a good way.

The first thing we decided to do, mainly because it hurt my eyes the most, was change out the front door. Well that and it was a security risk. Once that was done, we tackled the back yard.


Sooo much better! Already it looked like a new yard. Over time, we've slowly been working on adding landscaping to the front and back to make it more cozy and "us". I love a functional outdoor space so it's important for me to have curb appeal and a pretty place to sit during the few 3 days of pleasant weather in SC.

What we've done to date...
Front Yard
  • replaced the front door and added a glass storm door
  • added window boxes
  • cut down the tree shrubs against the house 
  • added boxwoods and camelias against the house
  • put out assorted pots of flowers along the walkway
  • added decorative items like the birdhouse, cross and house numbers
  • built a bed around the oak and planted cast iron plants with verigated loriape
  • added a vegetable garden to the left of the house using raised beds
  • put down pinestraw in all the beds
Back Yard
  • sodded and created borders
  • added beds around the 2 hardwood trees and added flowers
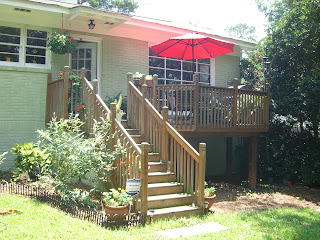
  • added flowers, grill and red umbrella along the deck
  • replaced the backdoor and also added a phantom screen (you know for those few 3 days you can open up the house in SC)
  • planted a few shrubs and flowering bushes around the area
  • added chairs for a little seating in the yard
  • built a privacy fence on the back property line (versus the wire fence that was falling down)

Here is what the front yard looked like this spring/summer.


And in case you're wondering, we still have ivy poop beside the front door. I'm hoping that when we have the house pressure washed later in the fall that it will take care of it.

And the backyard...


Much improved, don't you think? We still have a list of things we'd like to tackle in both yards - like...
  1. replacing the shrubs we planted in front of the driveway (not pictured). They are basically scraggly and not as "clean" as I had hoped they would be. I think loropetalum will look much nicer.
  2. adding some flowering shrubs along the fence line in the back - maybe a forsythia and some knockout roses
  3. possibly building a flagstone patio at the bottom of the stairs so we could enjoy the shade and also have more outdoor space
  4. refinishing the deck (again)
  5. BUILDING A SHED - this is top on the priority list. We need it for added storage. What you can't see from the pictures is the back of the shed is non-existent. It basically rotted and is held up by the hair on my chinny-chin-chin
  6. removal of the sycamore tree (boo-hiss) before it falls on our house. Lightening has struck twice and it's coming down next week. Maybe that will open up space for a swing set?
But all this is a wish list. As we look at new house projects, we always weigh them on the value and importance, not just for re-sale but also for personal need. Asking ourselves "will we get enough use out of it between now and when we sell to warrant the cost?"

So stay tuned! Any new projects will be posted of course but I at least wanted to share the progress of the past 4 years! So what about you - ever looked at before and after pictures over a long period of time and been surprised? Would love to see them so share with me!

Sunday, September 11, 2011

Survey says...

Remember that old game show The Family Feud where the host always said "survey says..."? Well this is a survey folks. But first a little history...

For a while now, I've wanted to put curtains up in our kitchen. I don't know why. We only have one small window over the sink but I feel like naked windows make a room look incomplete. There is one exception which is Daniel's man-room where he refuses to let me put any type of window treatment other than the blinds. Men.

Anywhoozle, I have been helping someone decorate their office building, which is an old house in 5-points. When I was fabric sourcing - one of my favorite things to do by the way - I fell in love with the colors in this fabric. I didn't buy it immediately but I kept thinking about it. (Daniel was with me so that doesn't usually go over very well, especially when we're about to have a baby and I try to take on yet another house project. And no, he didn't know he was "fabric sourcing" when he agreed to drive me out to the store during our errands). I kept wondering, how can I use this in my house? Can I convince Daniel to let me build a headboard and have it covered with it and re-do the bedroom? Probably not. Are there ANY other rooms in the house I could use it in? Finally it hit me that this would match the kitchen perfectly. So when I went back to buy additional fabric for the office project, I bought a yard. Oh and by the way, I also found another fabric I loved for new curtains for our bedroom. More on that later.

So on Labor Day, when Daniel got home from work and little Peanut went down for a nap, despite my hideously swollen and tired feet, I decided to put them together. I think design and decorating are calming to me. Well that and the fact I'm nesting. I cheated this time and used the iron on tape instead of pulling out my trusty sewing machine. I did line them since it's a bright window but didn't have the patience for the sewer. Now if I were a good blogger, I would have showed you step by step how to tackle the project. But lets face it. I'm 9 months pregnant and didn't really feel like chronicling every detail. So sorry. You can email me and I'll send you instructions if you want to tackle something similar.

I put them up this week and I'm not so sure. I love them at night and so does Daniel. But during the day they look a little dark. I'm not sure if it's that we aren't used to blocking part of the window so it's a shock or if it's just not the right fabric for the space. I have to admit the pictures turned out better than I expected and they look even better at night which leans me to the other side of the coin. Maybe we are just not used to blocking part of the window and it was a shock. And another side note - it appears the oranges don't really match but that's just the picture. In reality they match great.


Here's where you come in. I need you to give us your honest feedback - keep or try again? And if I try again, what about these doesn't work? Or should I go with a valance instead of the cafe style? Or lose curtains all together? Or do you like them and think they work great in the space?

So please weigh in with your comments!! All suggestions welcome. We're still deciding and agreed to keep them up for a few weeks and see if they grow on us.  

Tuesday, September 6, 2011

Take 2: The Nursery

No literally, take two...babies that is! Ready or not, in just 12 short days we will have baby #2 arriving! Cole Hamilton Schrall is due to arrive via c-section on September 19 unless he chooses to come early. I'll be very curious to see how big he is compared to his brother, Charlie, because boys and girls...this one feels like a whopper! Daniel asked me if I was having a little boy or a calf. He's super sweet like that. Still learning the concept of a "filter" that one.

Anyway, many people have asked us what his nursery looks like so I thought I'd give you a little tour. You'll recognize it because it's the same room Charlie's in. We only have 3 bedrooms in our little home - 1 for us, 1 that serves as an office/man-room/guest room and then the nursery.

This little room used to be Daniel's man-room back in the day but when Charlie came along, we converted the guest room in to a makeshift man-room, which actually has worked out better. We use it alot for watching TV and relaxing in, especially since we took out the guest bed and put in a pull out sofa instead. But enough about that room, that's not even what I'm featuring here!

Here's a pre-baby picture:


Then it transformed in to Charlie's room. You'll notice there are no closets in this little room so I had to be creative with storage.  Here's a quick tour of Charlie's room pre-Cole:


Then when we found out we were expecting our second little peanut, we realized we better be even more creative! So here is the updated nursery. Surprisingly it works really well and honestly, I like the layout much better. Let's start with the small touches that I added to "de-Charlie" the room and make it more for both boys:

On the nursery door
 This looks complicated for their front door but really it's a simple kit from Hobby Lobby that came pre-stenciled with the shapes and I glued it to a canvas. The canvas was simple enough to paint since the center was mostly the C and their names. The rest you just had to paint what was stenciled out and viola - a cute little name plate for the boys.


Then I added unique initial canvases that I painted over each of their cribs. Charlie had one before but I never really loved how it turned out so I repainted one for each boy. (oh, and you too can have your very own for your child - just ask me!)


 And each boy also has their own little plaque to commemorate their birth date and details (length, weight, birth time) over each of their cribs too.


And on the center table between the cribs, I have cute frames with each of their names. Little touches like this really helped bring the nursery together to make sure it wasn't just about Charlie.

So finally for the tour...starting at the right of the door...
laundry and stuffed animal hangout

Charlie's Crib
Cole's Crib


Wall shot of both cribs and their artwork

changing table and their only clothes storage (2 drawers each!) 
On the left is the end of Charlie's crib to give you perspective.

The next picture is probably my favorite spot - the reading nook. It took me FOREVER to find the bookshelf that you see hanging but I finally found it on Qualitytoys.com. Who knew it would take me so long to find something you see in every pediatrician's office and elementary school! I needed something that could hang and not take up too much space to store as many books as possible. There are still some stacked underneath but it at least gets most of them off the floor. The red tub is their toy bin.  


Here's a close-up since it's my favorite little spot (there's even a little stool between the chair and changing table with a giraffe perching).


And behind the door is the storage shelf. This holds all their blankets, bibs, changing table items and a litany of other nursery necessities. It's super useful but a little busy so I'm glad it's mostly hidden behind the door.


So that'[s quick tour of the nursery! Not pictured are little things like a set of hooks on the back of their door to hold their book bags, sweatshirts, etc. We also have tubs of clothes labeled by size under each of their cribs for the next size up. That way as they outgrow things, we can just reach under and pull out the next size. (the rest are stored under our bed, again, painstakingly labeled by size.) We have towels, formula, diaper items, etc all stored under their cribs in baskets as well - all of which are neatly tucked away behind the matching crib skirts I made and velcroed to the cribs.

In such a little room it pays to be organized! But it actually works out great and we ended up having plenty of floor space. Now if baby #3 comes anytime soon ... we're in big trouble!!! Not only for space but because Daniel will be in the looney bin!

Have you had to be creative in your nursery for storage? Ever felt like you were crammed in only to realize a little creative organization gave you so much more room? I'd love to hear how you save space!