Wednesday, August 27, 2014

Do It Yourself Growth Chart

I'm not the most gushiest of people. I sometimes seem hard on the outside and soft on the inside. Like a tootsie pop. Or an onion with many layers to peel back. But I do like sentimental things like family photos, things that remind me of my kids or our wedding (I still wear the dress I got married in 8 years later. Don't worry it isn't a white wedding dress.). Pretty much anything that reminds me of family I'm sentimental over. I love that we still use my great-grandmothers drinking glasses and dessert cups.  

So as the boys have been growing, I was getting sad I hadn't been tracking their height on anything. I love looking at my grandmother's house and seeing the markings of my mom and my uncles as they grew up. But I also wanted something transportable so as I moved, I could take it with us. 

And a Growth Chart was born (thanks to some Pinterest ideas). 


Now that  you've seen the finished product, let's go back to the beginning and show you how it came to it's new look. 

I started with basic stain grade 6 ft boards (one for me, one for Anna M...because you know we can't do a project without each other apparently) Albeit more expensive, I chose stain grade because it was better quality. If you plan to paint your board then you can simply get the paint grade but be sure to cover the knots in the wood with shellac so they don't bleed through. 


I decided to try pre-stain for the first time to see what I thought. I heard it was supposed to help the stain set in and be more even. All you had to do is wipe in on before staining. 


The verdict? Not worth it. I thought it took extra coats of stain compared to no pre-stain. Epic fail. 


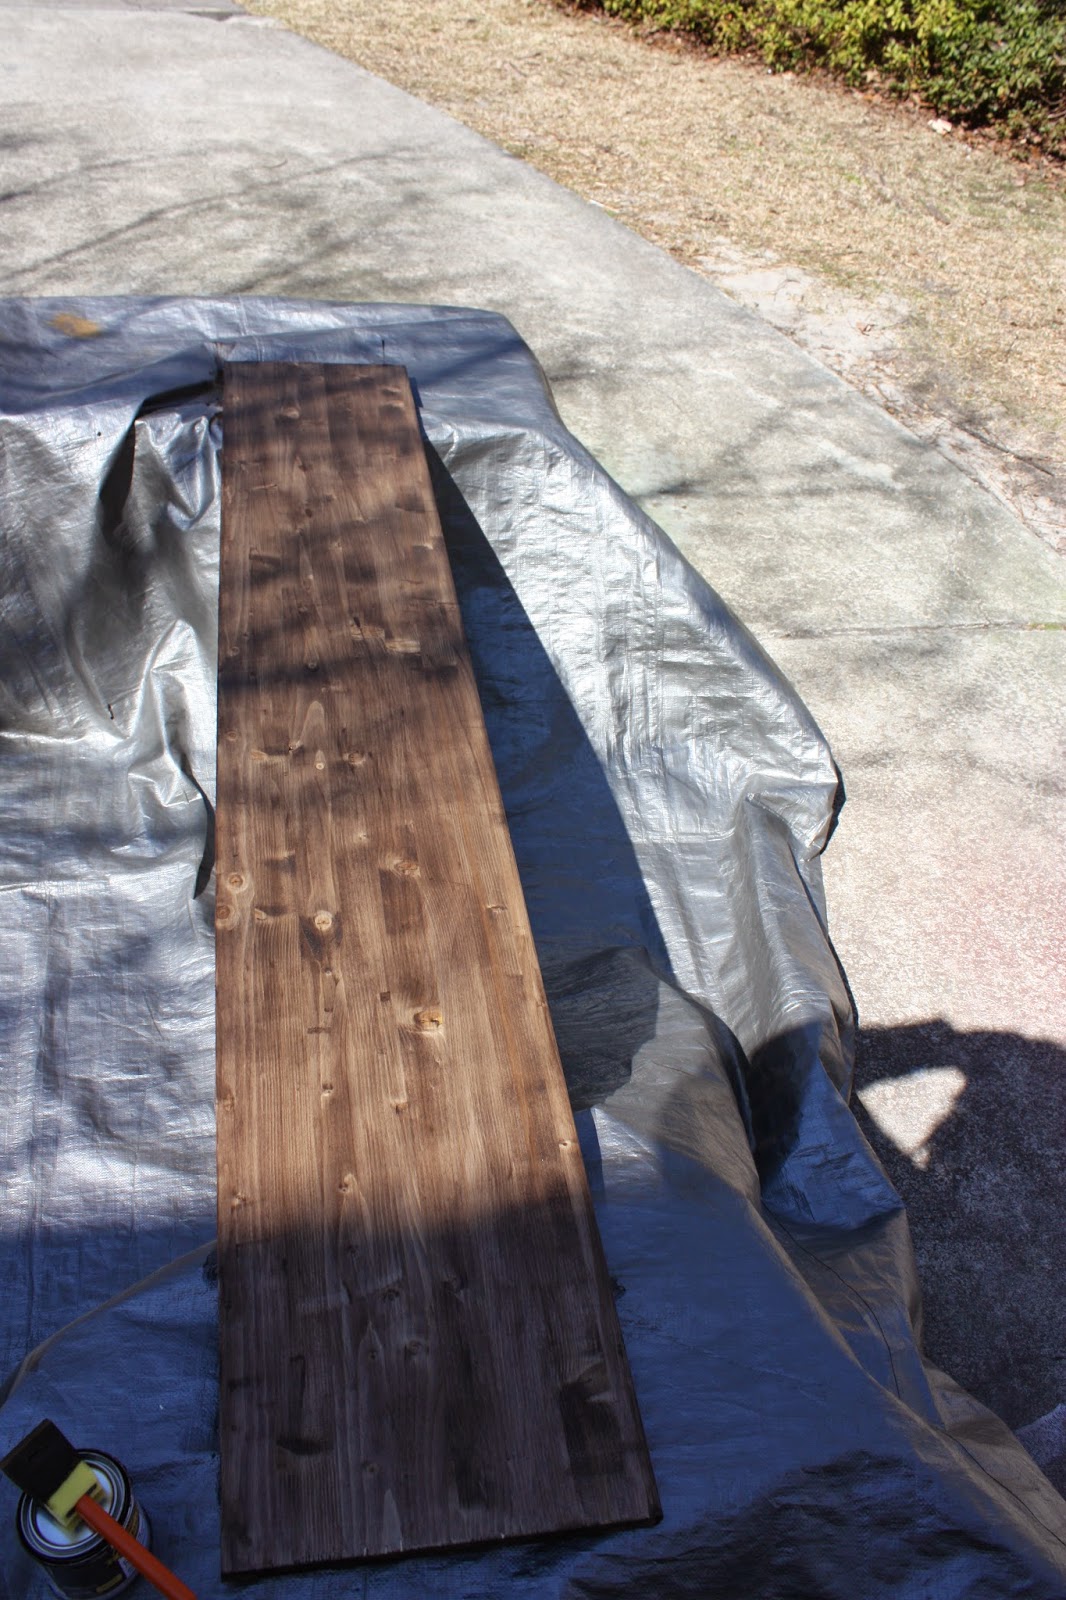
I chose a dark gloss stain for the boards so I wouldn't have to put a shiny coat of shellac or other clear coat on top. I ended up with three coats (thanks to the wood conditioner) and sanded in between each coat. 


Can you see the forced smile? I was a little irritated by the pre-stain. I had complete plans to put this together in one weekend and it took me waaaay longer since I had to wait for coats to dry longer. You can see what only one coat looked like here: 


And a second coat here. 


I wanted a really dark wood color so it was obvious that three coats were required. In between drying time I also had to figure out why I heard no children and only saw this: 


There are children supposed to be in this picture. Four boys to be exact. It's like a "Where's Waldo" gone bad. 

Low and behold...this is what we found. 


So a slight delay here and there for clean-up on aisle six...err should I say aisle four for four little boys...and for snacks. 


I have no idea what Christopher M. is doing in this picture. Some sort of toddler gang sign?

Once the board was stained, it was as simple as putting on the decals I ordered from Etsy. I believe my numbers are from this shop and then I ordered the name part from a different shop. Just search "ruler growth chart decal" in Etsy and all kinds of options pop up. I chose to put our last name and then est. 2006 (for when we got married and established our family) but there are all kinds of options. 


One important tip - be sure to measure your baseboards before you place the decals. I of course eye-balled it and was an inch off. Most Some may say to just adjust it when you measure kids but that was too complicated and not how I envisioned it so I had to cut off an inch from the board. 


Then the fun part begins! I chose to use a different color per person (except grandparents, they are all the same color). I also went back and added their birth height, 4 mos, 6 mos, 9 mos, 1 year to the board. I kept them in their baby books so it wasn't hard to find but if you haven't, just ask your pediatrician. They have a full record of it. 


I'm excited that we can keep this for years (and generations) to come. How fun will it be to record my grand kids one day?! 

If you have a growth chart, share! I'm sure we'd all like to see different versions. 


Monday, August 18, 2014

A Napkin For All Occassions

Good news! This project is toddler friendly! 
(Well unless you're the Other Anna where toddlers and paint make you nervous)

Back in May (admittedly this post is a little late...ok alot late) I was scouring my brain for what to get my mom for Mother's Day from the kids. I want it to be personal but also something the boys get to participate in picking out or putting together. Then I came across a post on this blog and it inspired me to make my mom napkins. 

You see, growing up, we always had a set table for dinner. That meant the right utensils, napkins folded and put in their rightful place and of course that meant we had to use proper manners. She learned it from her mom who almost always used cloth napkins on holidays and special occasions. I'm sure my grandmother learned it from her mom and so on and so forth. 

Anyway, it's probably where I learned to love cloth napkins. I mean I should use them every day as many as I have and as much as I love them. Hmmm...note to self: contemplate using cloth napkins daily. 

So off I went to the store for supplies. It was easy to find white cloth napkins but be sure you buy the ones that aren't super stain resistant because I'm not sure how the paint would adhere to them. Then it was a simple act of picking out paint fit for fabric (just read the label) and a few sponges. I bought the craft sponges that are circular and have a stick already attached. It's easier for toddlers. 

And off to the races we were...the boys absolutely loved this project. I gave them a plate of paint colors and a sponge for each color. All the had to do was dot the cloth. It was a hit. I'm talking Big. Huge. I have to go shopping now! ($1 for the person who can name that movie! - Jenny H. you don't count) 


I let them do two (we had 8 total) and I did the other six. I figured if mom had people over she could give the guests the less-toddler-ish napkins and they could eat from the ones the boys made. Although I have to say, their version was very cool and modern looking. I've thought about having them make me some from my old napkins. Nothing says "no there's no stains here" like a big blob of paint. 


There's turned out very cute I must admit and it took us very little time. 


I finished off the rest with a more precise smattering of polka dots. 


What I love about this project is that there are no limits. You really can tailor it to any occasion or color scheme.  Here are some variations you could try: 

  • Stripes (vertical, horizontal, chevron) - free hand it or use painters tape
  • Polka dots (like we did) for any season: orange, gold, black for Halloween; red and green for Christmas; garnet and black for USC football games (or any school colors) - how fun would they be for tailgating! 
  • Use a favorite stencil and make a pattern either all over or just in one corner (a fleur de lis or a bumble bee would be cute and universal)
  • Use a letter stencil and monogram it (like down in one corner would look super cute)
  • Free Hand Toddler - well that's what I'd call giving kids a paint brush and paint and let them go at it! Give them one color at a time and you might be surprised at how cute it turns out. Sort've like an early Van Gogh look. 
  • Play with color - I mentioned some in the polka dot idea but think even further like coordinating with your china or a baby shower theme or the colors in your house. 
Really the options are endless! And the best part, the kids can help. They were so proud to give them to Nana and she commented multiple times how much she loved them. 


It's a win in Schrallville! I think I may update some of my old napkins now. Nothing like writing a blog post to inspire you to do an art and craft with the kiddos. Daniel will be thrilled. Not. (he hates arts and crafts) 

And these are easy Christmas gifts too. 

Oh and the movie reference? Pretty Woman. C'mon people. Get with the program! It's a classic!

Wednesday, August 13, 2014

SSS Fun

It's so hard to believe that summer is almost over. For many school starts back this week, for us it's the end of an 'era' because the boys will start preschool in less than two weeks and we no longer will have our sitter. That officially marks the end of summer for the Schralls. Usually we don't ever notice because our schedules just continued as normal. Now it's about to turn topsy turvy as we adjust to preschool schedules. 

Anyhoozle, I thought it was a good time to reflect on some of the Sun and Sand time we had this Summer. (SSS get it? sand sun summer. It was the best I could come up with people. The children are making me sleep deprived.) 

I already told you about the mountains here but we also had plenty of time on the other end of the spectrum. Ahhh, I love sand and sun. 

The boys and I went to visit Nana and Pop-E at the beach for a week while poor daddy had to work. The new trick we learned this year was dribbling. No, not dribbling that you think of when you typically associate dribbling and boys (although that happens often too and I find it gross). I'm talking about when you take a bucket of watery sand and dribble it to make tall columns or castle tops. That was a huge hit with Charlie...


Cole preferred a more destructive pattern of pouring his out and stomping on it or anything else he found someone made. One thing they both loved was sitting with Pop-E and building sand castles. 


I think one of the cutest moments I captured was finding Pop-E and Charlie in the hammock. They were sharing squirrel stories. Yep, you read that right. Stories about squirrels.  It was a cute little moment that warmed my heart. I can picture many more conversations and stories being shared between them. I couldn't ask for a better influence for my boys. 


OK moving on before I start to cry...

Cole has just started getting in to dressing up. Not cross dressing thankfully but dressing as bad guys, super hero's or in this moment, a pirate. (but notice the super hero t-shirt)


It started as a little walk to the bank with Pop-E (all of 1/2 block down the street)...an hour later they came rolling in with pirate gear, candy and pirate money. Apparently they got lost on the way home and went to the museum, rode a trolly, found some ice cream and bought some pirate gear. 

This is Cole's "ARRGGH MATEY" face over a bowl of oatmeal. Yep, he wore the eye patch to breakfast the next morning. 


And not to be bested by his little brother...


Nana and Pop-E's is always an adventure...and full of lots of love. 


Perhaps one of the things we did most this summer for the first time was go to the lake. The "Other Anna" has a lake house and we got to go on day trips throughout the summer. The boys were so excited each time we got to go. I mean, wake me up at 6am with "can we go to the lake house now?" excited. I'm sure I never did that as a child. I was always patient. 


(see how I distracted you from that whopper of a lie with a cute picture of Cole?)

They would play and play and play with their best little friends and even some new friends! On the last day trip we took them out tubing for the first time. I thought for sure Charlie would skip it (he usually doesn't like to try new things) but he jumped right on! At one point, after being popped up high by a wave he yelled "woohoo! yeah!" 


It helped that his best friend, Christopher, was joining him. 

Somehow when I joined them I think they were a little less enthusiastic and a little more "what is she doing" . I mean I have no idea what they're talking about...isn't this how most people ride? 


Needless to say, there were some happy kiddos every time we got together.


Summer may be over but the memories are not. I'm excited about starting a new season of life and building some more fun memories as the holidays approach. 


Wait, is anyone else panicking that Christmas is only 19 weeks away???

You can thank me for that panic attack later.