Wednesday, August 28, 2013

It's snowing in Schrallville

While it is currently a balmy day in Columbia, it's snowing in our house. Don't believe me? Take a look at the floors...


Aren't they pretty? And in some parts it's over a foot. OK. Maybe not that much but I'm pretty sure you could make a snowdustman.

The last few weeks have made great progress but for blogging sake, it made sense to wait so you could see a few more dramatic photos. It can be hard to track every little square inch of progress week by week. So without further ado, here's what's been taking place over the last few weeks at Schrallville...

The kitchen cabinets have been built:


In the lower picture, that hole is where the stove will go and above it, the microwave. You'll also notice a little cabinet beside the drawers. I don't know why but I'm so excited to have it for pans and cookie sheets. Maybe it just reminds me of the clever one my grandmother, Gimmer, used to have and it's nostalgic. Either way. Excitement.

We decided to order new cabinet doors to match versus having some made to match the existing 1955 doors that I didn't like. They probably won't be here until literally the day before we move in but it's worth the wait. Our appliances are also ordered but we're waiting on the floors to be refinished before we can install.

Oh and speaking of floors...under six (6!) layers there were hardwood floors in the kitchen. Can I get a HIP HIP HOORAY! Of course there were 1000's of staples in them and you can't see them from the construction dust...but they are there and will be refinished with the rest of the house.

The laundry closet was completed along with the guest nook closet:


It's hard to tell in the picture but the laundry closet actually has a semi-rounded wall. They still haven't built the shelves but that will come next week. As for the guest closet...seriously it's as wide as I am. Don't bring much stuff if you come to visit.

We also decided last week to have them prime the entire house in ProBlock. This is a great primer that blocks smells and stains at the molecule level. It's going to ensure that any hidden stains won't show through after we paint and it also saves us a step. The trim was all in oil based paint so we would have had to prime and paint. Yuck. Now when we move in we just have to paint everything - no priming. Sweet.

Take a look at how grungy the old trim paint was compared to the bright white primer:


I can't tell you how much brighter things look already just with the primer!

They also replaced the shower floor in the master bath:


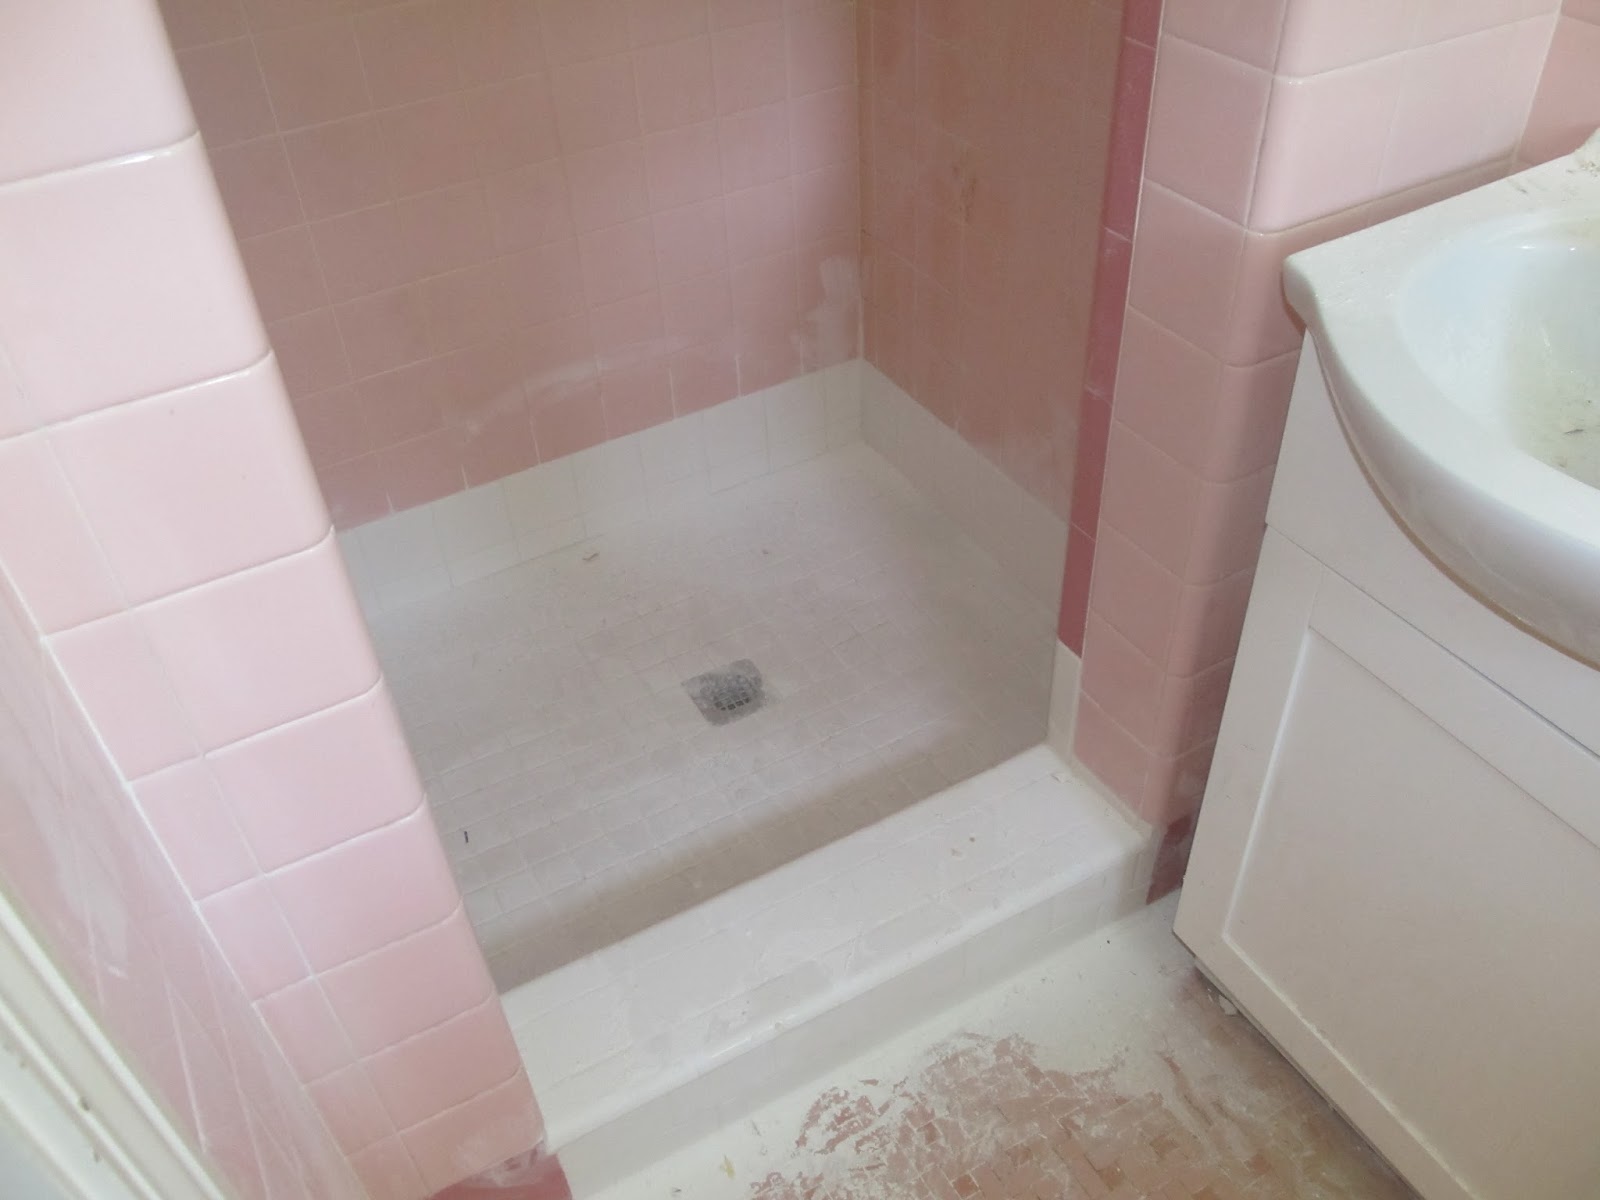
They had to replace the drip pan which wasn't dripping but rather raining under the house. To do so they had to rip out the floor. Sort've nice to have a white floor that feels clean-ish. You can tell in the picture they also replaced the vanity already but still need to put in the mirror. Hard to believe we'll be showering in this bathroom in just a few short weeks. Perhaps I should shower the bathroom first. Guh-ross. And yes, that's a plunger in the sink. Don't ask me why.

Daniel may disagree (he's not a visionary) but so far I feel like things have gone fairly smooth. It's stressful, don't get me wrong, but most of that is because we're also juggling a family and full-time jobs. This week we learned our kitchen sink was discontinued so we had to pick another one, change the faucet to match and coordinate the cabinet knobs. But I have to say, in the end, I have loved every second of it.

Daniel has decided I need to change careers and become a contractor and professional stager. Can't say I disagree!

Now it's on to a lot of the smaller detail work before floors can be finished, granite counter tops and sink can be installed and final electrical work can be complete.

Thursday, August 15, 2013

Shopping Surprise

Last weekend we had plans of tackling the mold around the new house's trim, trying to remove the paint splatters from the brick via power washing and painting the shutters. But Daniel had other plans. He surprised me Friday with the idea of going to Charlotte to a fabulous, huge indoor flea market. Could it be? Could there really be a little piece of heaven here on earth just an hour and half away? Pinch me.

Let me introduce you to The Depot.


I had never heard of the place but some of Daniel's clients recommended it. It is 88,000 (I'm about to faint) and over 600 booths. The neat thing is that the booths aren't manned. They have prices on their items and if you like something you simply take it up front to pay for it. Here are a few things we found we liked...


We loved this blue table. I could totally picture it in our living room beside the couch or in between two chairs. Daniel really loved it too but it was a little out of our price range for now.

In the same booth there was also this that I fell in love with...


Curse you mom for giving me such expensive great taste!

We also found one of the things we ended up buying, our kitchen island. I was thrilled to find one that was unique but also had some storage and a good price.


I really, really, really want to go back again once we move in. We didn't have near enough time to pick through all the booths. We snagged a really cool old iron key, a huge basket and an old wooden box but we didn't have time to really sort through the rest. I was so excited that my mind was racing the entire time. Never let me go there alone. I can't be held responsible for my actions.

The next big stop was Ikea.


I was so excited to go for the first time. I'd heard great things about them and we were told to go check out couches there. Perhaps not so smart on a Saturday before school starts and their new catalog has just come out. Seriously it was so packed we couldn't even navigate the aisles. Check out how packed check out was...


One thing we did learn is that we aren't huge fans of their furniture. Some of it was sort've our style but for the most part it was too small and/or too contemporary for our taste buds. I did find a desk...but they were out of stock until September. I also found a storage unit for the kids' closet and a few other storage items for the pantry. In the end, I'd go back (and will in September for my desk) for housewares but not for furniture. That's just me.

Perhaps the best purchase of the day was the cute tent we bought for the boys for $20. They even ate their dinner in there that night.


week 2...let the scary begin

Well week one was pretty dramatic...the fact that you can see our house was pretty big for me. But week 2 began the scary bit of this journey...ripping out stuff. Now we already had spots like this in the house so it's not like we started with a clean, pretty slate. It was already a little scary. This happens to be the wallpaper in the master bedroom (blue) and the hallway (cream).


And then there was this...in the dining room. I think one of the contractors said (and I quote) "this is some scary wallpaper. some of the worst I've seen!"


But the really scary part started when the walls started getting ripped down...ok maybe not ripped down but definitely ripped apart. As you'll remember in this post, one of the things we wanted to do is widen the doors in the living room so it felt a bit more open. Week two began that process...


As you can see, Charlie thought it was great to run around the house. A vast improvement considering the first time he saw it he walked 2 steps and said "no mommy, that's scary and too many bugs." Nice.

The doors were widened several inches both up and down and you can see the lines in this picture.


And this picture...


In the end, it really opened up the rooms and made it feel more spacious. It's hard to tell in these pictures but trust me - huge difference.


They also started working on the laundry closet. A brief recap, we're stealing the guest closet to turn it in to a laundry closet and taking the hall coat closet to be the guest closet (which will be a whopping 1cm wide...ok not really but if you visit, don't bring much...no seriously, one outfit.) Check out Daniel as he starts to see the devastation progress.


Don't let his smile fool you. He was a little freaked out.

There was also all kinds of little things that happened as well...like removing the sink and tearing out a cabinet top.


Perhaps the best part of week 2 was our own work - removing the old ancient and dusty curtains. We ripped out not only the curtains but also the metal mini blinds. Sayonara dust traps from the 80's!


It was amazing how much more light was let in. And of course the boys thought it was super fun to play in their new house as soon as they discovered they had a huge closet they could hide in. They also had fun running around yelling "echo!" and squealing with delight as it radiated off the walls (and in their parent's heads).


Week 3 here we come!

Sunday, August 11, 2013

I shall be organized.

I tend to be a pretty good organizer. Rather it be an event, a cupboard or my "to do" list. I had to learn very quickly how to best use space when I moved from a 2100 sq ft house to a small 2-bedroom apartment in my late 20's. Then again when we had two kids back to back in a 1300 sq ft house (along with 2 dogs and a cat). In our last house the boy's room didn't even have a closet. And might I add I love shoes and live in a small house? Big problem. So as you can guess, there will probably be a few posts about this topic as we unpack and address storage in Schrallville.

To get a jump start, I decided I needed to work on my office filing system. The stack-folders-in-a-box system wasn't working anymore. Plus, I found myself not really having a great system for all our personal items. You know, insurance, finances, passports, birth certificates, etc. It was sort've organized in one of those file boxes but it wasn't ideal. And Daniel had no idea where to find things.

Imagine my delight when I bought the Better Homes and Gardens Storage Summer 2013 issue recently and found a perfect solutions. I am always looking for ideas and this is by far the best idea I've found thus far for an office. I've tweaked it for my own personal needs but it's generally the same.

Essentially you divide your life in to four sections and color coordinate accordingly. They recommend using colored hanging folders but I didn't have those so I settled for colored folders instead. I'll just use the generic hanging folders to store my colored folders. I also tweaked the colors for what I had on hand (green, blue, yellow and pink) and didn't bother to make sure they all were left, center or right tab folders. That was a bit too much detail for me. This doesn't address the work folders but that's not as complicated since those are sorted by client.

Here's a picture of their system so you can see what I'm talking about with the differences.


So here's my system:

1. Financial (green folders) - banking, credit cards, investments/retirement, mortgage, employment (one folder for each), property assessments, taxes, utilities and wills/estate planning. I'm also including our rental agreements/leases (one folder per renter) in this section since it's income. You get the picture!

2. Insurance/Vehicles (blue folders) - anything related to vehicles, health insurance, property insurance, titles, life insurance, home warranty, etc. Essentially anything that has to do with insurance or cars.

3. Personal (yellow folders) - I'm starting with one file per family member but may expand from there. For instance I'll put birth certificates, passports and other things like this in this section. I am also including pets in this section. Other topics in this section could be church, sports, vacation, hobbies, mementos etc.

4. Home (pink folders) - this is for home projects, warranty info, repairs, landscaping, home owners info (if applicable) and anything else related to our properties.

I've finally taken the time to go through the documents not already packed and will finish it up when we move.

Next step: buy a file cabinet to put it all in!

This may not excite many people but it sure does excite me! I'm weird. I know.

Monday, August 5, 2013

Removing A Forest

OK so maybe it wasn't a forest but it felt that way if you looked at the before pictures! Last week while I was visiting my parents with the boys (their awesome sitter was on a much needed vacation) work began on the new house. First up? Tree removal.

Let's start with the before shot so you can reference what trees I'm talking about...


What house you say? Exactly. That's the point. There is was a giant cedar tree in front of the house that was massive. Everyone who saw it said it had to come down or we had to put lights up and have a giant Christmas tree on year round as a landmark. There were also huge azaleas and other overgrown shrubs in front of the house that really dated it.

Here's another view of the front yard before de-foresting:


I'd also reference the roof which was in very poor shape but you can't see it BECAUSE OF THE MASSIVE TREE. So imagine my delight when I receive an email from our contractor with this!


You can actually see the house! Well most of it since The Big Red Box is blocking a small portion of it.

They took out the giant cedar along with 5 additional small trees that were scrubby and/or dying. I learned from our new neighbor that one was just planted 2 years ago and was expensive. Ooops. We also went ahead and asked them to remove the overgrown shrubs in front of the house so we have a clean slate when we start landscaping in 2020. Seriously, it's going to take that long to save for landscaping after we update so many other higher priority items.
 

Shortly thereafter they started work on the roof. In the before picture the old roof is on complete with the little twirly ventilation thingy's (I'm sure that's their technical term) that were on the back. But now we have architectural shingles, no twirly ventilation thingy's, a newly installed attic fan and all the other small repairs that were required when they ripped the old roof off. It's not glamorous but very needed (and expensive).


Eventually (or maybe sooner) we'd like to tackle painting. The brick has a lot of stains and paint drippings that make it look old. The shutters are faded and the aluminum siding wasn't painted properly the first time. All that = much needed paint job. We're strongly considering painting it ourselves. I love a painted brick house. Anyone have any suggestions on how to paint brick? I'm almost tempted to start it now so it's done before we move in. I hate sitting around during all this time and not doing a little DIY.
 
Next up this week via our contractor, starting the kitchen cabinets (adding where there were none), widening a few doorways inside, building a laundry closet in the hallway and the removal of wallpaper. They might even get to the painting of the ceilings. It's going to be an exciting week in Schrallville, ladies and gentleman!