Thursday, August 25, 2016

From Chewed to New

It's no secret that our house is a little chaotic farm-like...but located in the city. We've adopted a new kitten or rather he adopted us by climbing under my car and taking a ride with us around town. Ryder he is aptly named.

Then we also have 3 dogs...all rescues and 2 of 3 are barely over a year old. Yes, our house is at times a circus when you also throw in an almost 5 and an almost 6 boy.

One said dog who shall remain nameless but not blameless (hint: he's black, steals anything and everything to chew up and is a furry mess) decided that our coffee table would be a good chew toy.

Enter evidence:


Not to mention the table was already a little scratched from years of wear around toddlers. But I just couldn't trash it. I loved the style, loved the size and it was still very sturdy. So off to work I went.

First I used a jigsaw to cut off the chewed corners. I essentially angled all four legs (2 were chewed) that used to be round to be more diagonal.


Cole then helped me sand them down to be a tiny but smoother on the edges.


Then it sat in my living room just like that...for months. Note the winter clothes above. We're now at the end of summer and I just finished the table. Yep, it sat cut up for many, many...many months.

Finally last weekend, as I sat on the couch completely exhausted from starting Kindergarten - I decided to get off my bum. And yes, I totally struggled with the new schedule. I mean that one extra hour earlier near about killed me. Needing to be out the door at 7:10 to walk to school? Murder. I'm pretty sure I struggled the most out of all of us.

Anyway, I digress.

I pulled out my Annie Sloan chalk paint that I've had for awhile. Sadly it had settled so I had to really stir and shake...stir and shake...until it was revived. I used Country Grey since it's what I already had on hand.


I did not sand it but I did wipe the top down with Windex to remove any oily residue...just in case. Here it is with two coats of paint:


While cute, it's sort've boring. So I set off aging it. I used a sandpaper block and went around all the edges and corners playing around with what I liked and where it might age naturally.


I of course forgot to take a good picture of the waxing process so we won't consider this a true tutorial. However, I put 1 coat of clear wax and then one coat of dark wax to darken the color a bit, using cheese cloth to do it. You only need a thin coat. It's sort of like rubbing in lotion in a way.


I'm so happy with the finished product! You can't even tell that they legs were chewed anymore unless you really inspect it. The aging process really helps to deflect and now it just looks like a cool distressed table.


I think I may apply the same concept to the back corner cabinet at some point when I feel motivated...in about 8 months.

Pretty cool, huh? Didn't cost me a dime and I just repurposed what I already had. Oh and for those of you curious, it took me just a few hours (due to a little drying time) then I let the wax set overnight.

Thursday, August 18, 2016

House Tour 2016

Hey y'all! Come on in! Welcome to Schrallville! It's so good to see you!

Since it's been awhile since I've shown the house and I'm constantly tweaking things, I thought now would be a good time to show you our current house before the holidays hit. So with that, let's start the grand tour. 

First, outside, specifically our front yard, which looked like this when we first moved in: 


Clearly in need of some curb appeal! 

Last fall I designed and planned the front beds with a variety of shrubs and perennials that would do well in the hottest place on earth Columbia, SC. As you can see, we chose smaller shrubs due to cost but things have done quite well and we have a new colorful front yard. 


You may have noticed that the front porch is different. In fact it is...more on that later but needless to say, it's one of my favorite spots to sip coffee or have a cold drink. 


Let's walk on in to the "man room" which is just off the front porch and the main room we tend to hang out, especially in the evenings. It's also my home office. Before it was an overload of wood...wood paneling, wood windows, wood trim, wood everything. 


And today it looks a lot like this...


It's probably the least completed room in the house. It has to house my home office, the cat litter (hidden strategically in the dog crate to the right until the kitten is older and said litter box can go away), movies, books and Daniel's home theater system. So to me it tends to feel a little disjointed. But for now, it works and maybe in time we can find better storage or furniture options. 

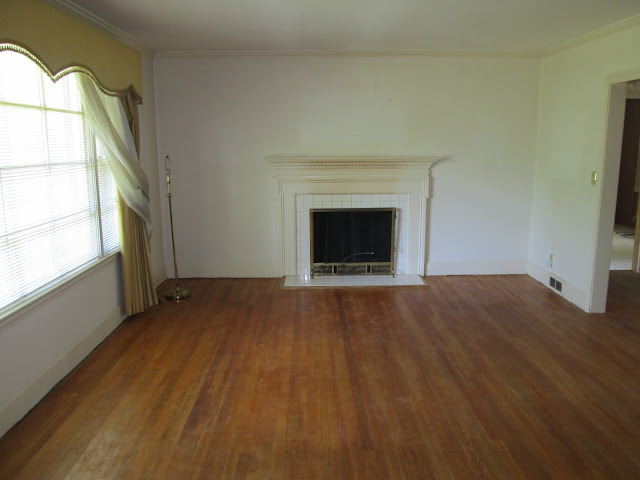
Let's move in to the dining room/living room which are connected. Again, before...


And now, what I hope is a cozy but colorful main living area...

view from the front door/foyer

view from the dining room


Much of the furniture in the living room and dining room have been re-purposed or salvaged. Let's focus on my newest addition, the striped chair to the left (above). I literally pulled that off of a friend's trash pile as they were moving. Daniel doesn't even really blink an eye anymore. I got the "am I really supposed to take this chair home?" but he already knew the answer. A little updating and a trip to the upholsterer and voila! a cool new chair. Both chairs below were salvage (one from Goodwill for $5) and were aged and covered in the same fabric. 


The kitchen is perhaps the biggest transformation but it's also still IN transformation. Before...


And as of today...


We recently had the lower cabinets painted a "greige" color because I was tired of wiping down white cabinets. I love white in a small kitchen but with 3 dogs, a cat and 2 kids...it always felt dirty. I love how the color helps recess the appliances and the island stands out a little more now. Soon additions will be made to include:


  • Tile backsplash (white subway tile) with grout to match the lower cabinets to tie it all together
  • Can lighting 
  • Venting the microwave OUT of the house. Another lesson learned in reno. If it doesn't already vent out, make it so during initial reno. 
  • Change out the overhead light to one from my grandmother's house. I'm so excited about this I can't even explain! 


You'll see from this picture that I've recently created a command center in the hallway. We needed a place to keep school papers and dates for all to see. A table from another room and a few organizational pieces and we were set. 

Let's head down the hallway, shall we? 


And in to the boy's room which looked like this initially...


But now and with some recent additions, namely a larger red rug, it looks like this: 


That pile of toys you see is a dragon lair. Just in case you were wondering. The dragons are sleeping and the soldiers have been fighting them most of the afternoon...well until big brother came home from school. I didn't even bother to photograph the closet area that houses toys and their arsenal. It's a train wreck right now. 

The larger rug in here makes the room actually feel so much larger and they love having a softer place to play (we put carpet pads under the rug). 

The guest room recently received a makeover to accommodate an office/study area for Daniel. He starts back with seminary next week after a 5.5 year break and needs a place he could study...and close the door from 2-legged or 4-legged visitors. 


I was so thrilled that the bed, rug, desk and desk chair came from consignment. Then we simply used what we had for the rest of the room. He loves it and it feels much more put together to me too. 

And finally our bedroom...complete with country blue wallpaper before we moved in.


And now...


I probably should have paid attention to the lighting in my photo but oh well. You get the gist. There are plans to paint the tall dresser at some point. The top of it is damaged and a coat of paint would really update it. I would also like to repaint our bedside tables. They have a case of "spray paint gone wrong" and need changing up too. 

The bathrooms have undergone minimal updates. They are the one area of the house we've put off for now, mostly because they are so expensive. Our bathroom before...


And now...


While pepto pink is not my first choice, at least it ties in with the colors of our quilt on our bed so it's not completely awful. And clearly I need to straighten a picture. Details. 

And the guest bath before...


And now...


So that's it folks! Thanks for stopping by and taking a tour of Schrallville! As we undergo some updates (hopefully in early fall), I'll invite you back in again to see what's changed. 

Until then, pop on over and sit with me if you're in the area! Or call, I can still sit here. Either way, I'll be right here when I have a spare moment.